![brioHR-logo-color.svg]](https://support.briohr.com/hubfs/brioHR-logo-color.svg)
Audience & Scope
Audience: HR Admin
Module: Admin Settings & Time Attendance
Country: Global
Pre-requisites: Access to Admin Settings
Creating multiple work shifts helps HR assign different work schedules to offices or specific employees. This simplifies work rostering for HR and managers.
Step-by-Step Guide to Creating Work Shifts:
Log in to your BrioHR account,
1. Navigate to Settings.
2. Go to Schedules & Shifts.
3. Go to the Work Shifts tab.
4. Click on the + Create shift button.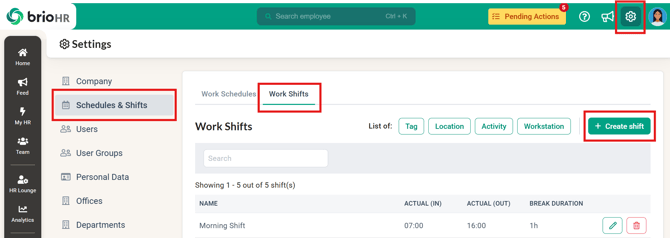
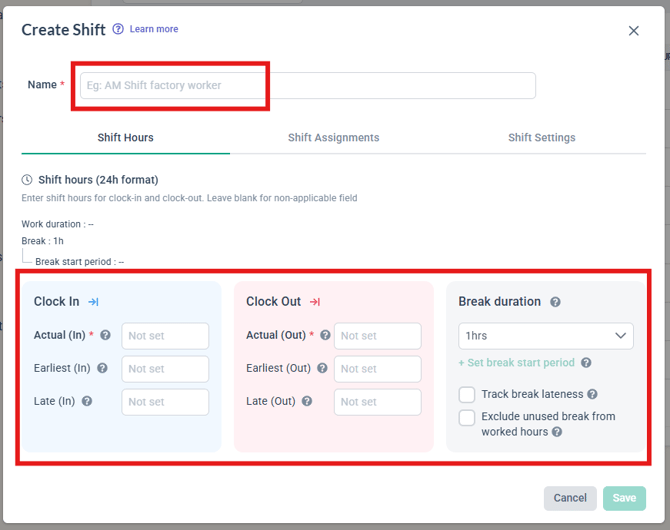
5. A pop-up window to create a new shift will appear:
-
Name your new shift. This field is compulsory.
-
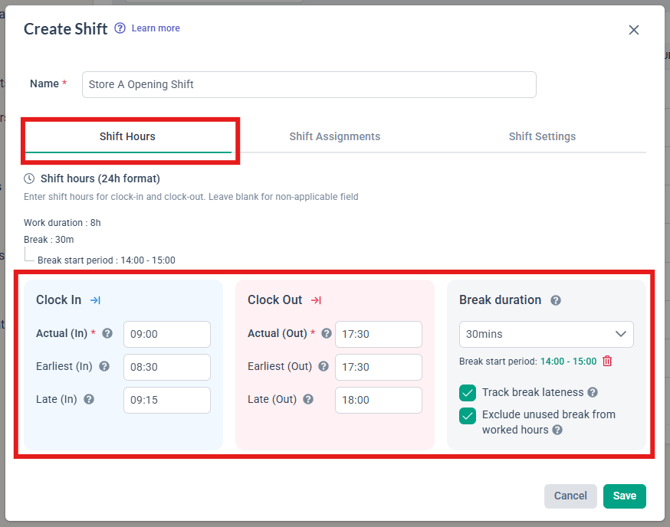
Input Shift Hours. The shift hours are used for the employee's clock-in and clock-out. You can leave the field(s) empty if the hours are not applicable.
-
Actual (In) *mandatory*: the actual time the employees clock in for their shift.
-
Earliest (In): the earliest the employees can clock in for their time to be counted as OT. If an employee clocks in before this time, the OT calculated will be capped based on the earliest-in time set for the shift.
- Scenario example:
- Setting: Actual (In): 9.00 am, Earliest (In): 8.00 am
- If an employee clocks in at 7.30 am: OT before shift = 1 hour (8.00 am - 9.00 am), 7.30 am - 8.00 am not counted for OT.
- Scenario example:
- Late (In): the latest time the employees can clock in for their shift without being considered late.
- If an employee clocks in before Late In time, they will NOT be considered late
- If an employee clocks in after Late In time, they will be considered late, and lateness is calculated by comparing late clock-in time against Actual (In) time.
- Scenario example:
- Setting: Actual (In): 9.00 am, Late (In): 9.15 am
- Employee A: clocks in at 9.10 am = No lateness
- Employee B: clocks in at 9.20 am = 20-minute lateness
- Actual (Out) *mandatory*: the actual time the employees clock out for their shift.
- Earliest (Out): the earliest time the employees can clock out for their shift without being counted for 'Early Out'.
-
If an employee clocks out after Earliest Out time, they will NOT be considered as early out.
- If an employee clocks out before Earliest Out time, they will be considered early out, and early out is calculated by comparing early clock-out time against Actual (Out) time.
- Scenario example:
- Setting: Actual (Out): 6.00 pm, Earliest (Out): 5.45 pm
- Employee A: clocks out at 5.50 pm = No early out
- Employee B: clocks out at 5.40 pm = 20-minute early out
-
- Late (Out): the latest time the employees can clock out for their time to be counted as OT. If an employee clocks out after this time, the OT calculated will be capped based on the latest-out time set for the shift.
-
Scenario example:
-
Setting: Actual (Out): 6.00 pm, Latest (Out): 7.00 pm
-
If employee clocks out at 7.30 pm: OT after shift = 1 hour (6.00 pm - 7.00 pm), 7.00 pm - 7.30 pm not counted for OT.
-
-
-
Break duration *mandatory*: The break duration the employees are entitled to during their shift. (If no break time for this shift, choose 'No break' option).
-
If the 'Track break lateness' is ticked, any lateness (from exceeding break duration) will be added as lateness in the timesheet.
- Scenario example:
- Setting: Actual In: 9 am, Late In: 9.15 am, Break duration: 30 minutes
- Employee A clocks in: 9.15 am, Break time duration: 35 minutes, Total lateness: 5 minutes (no late in, 5 minutes from exceeding break)
- Employee B clocks in: 9.20 am, Break time duration: 35 minutes, Total lateness: 25 minutes (20 minutes from late in, 5 minutes from exceeding break)
- If the 'Exclude unused break from worked hours' is ticked, any early in from break time will not be counted towards work hours.
- Scenario example:
- Settings: Break duration: 1 hour,
- Clock in: 9 am, Clock out: 6 pm,
- Total break time: 45 minutes
- Actual work hours: 8 hours (not 8 hours 15 minutes, as 15 minutes unused break time is not counted)
- Note: this option corrects future dates from the moment it is enabled. For past dates that already have clock-in/clock-out records, the timesheet still needs a manual adjustment — edit the recorded break time for those days (or reject the affected overtime).
-
-
- Define break period (optional): Set a specific time window during which employees may start their break (clock out for break).
- When enabled, set a Period starts and Period ends time. Employees can begin their break any time within this window, but total break time used is still capped by the Break duration. Employees cannot start a break earlier than the Period start time, but can return later than the Period end.
- Scenario examples:
- Shift 9:00 AM–6:00 PM, Break duration 1 hour, Break period 12:00 PM–2:00 PM
- Employee clocks out for break at 12:30 PM and clocks back in at 1:25 PM → 55 min break taken = no lateness.
- Employee clocks out for break at 1:30 PM and clocks back in at 3:00 PM → 1 hr 30 min break taken vs. 1 hr allowed = 30 minutes lateness.
- Shift 9:00 AM–6:00 PM, Break duration 1 hour, Break period 12:00 PM–2:00 PM
- Take Break button visibility: The Take Break button is clickable while the employee is within the break period window — outside it, only Final Clock Out is clickable. If no break start period is set, both buttons remain available at any time.
- If left unset (default), employees can take their break at any time during the shift.
- Define break period (optional): Set a specific time window during which employees may start their break (clock out for break).
NOTE:
For Clock In - The Late In time cannot be before the Actual In and the Early In time cannot be after the Actual In.
For Clock Out - The Late Out time cannot be before the Actual Out and the Early Out time cannot be after the Actual Out.
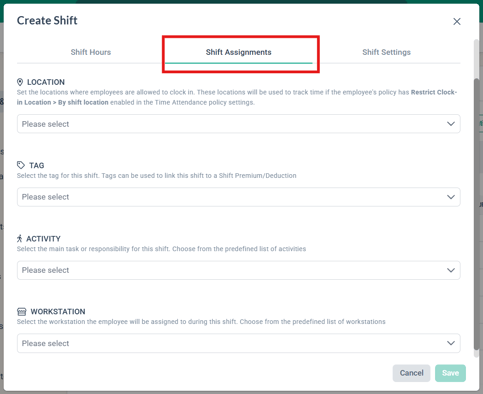
6. Next, click the 'Shift Assignments' tab to assign relevant tag, location, activity and workstation for this new work shift. These settings are not compulsory. They can be left blank.
-
-
- For more guidance on this, refer to this article:
How to Create Tags, Locations, Activities, and Workstations for Efficient Work Shift Management - The Tag field accepts more than one tag per shift — select as many as apply. This is useful when a shift needs to be linked to more than one shift premium or deduction rule (e.g., a shift that's both "Weekend rate" and "Has meal allowance").
- For more guidance on this, refer to this article:
-
-
- For more guidance on this configuration, refer to this article:
How to Configure Half-Day Leave Handling for Shift-Based Employees in BrioHR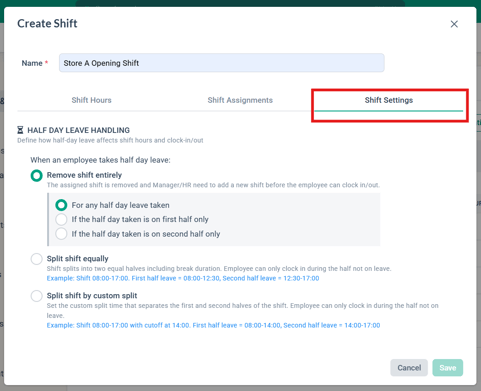
- For more guidance on this configuration, refer to this article:
NOTE:
When you create a new shift, the default selection is Option 2: Split shift equally. If you do not configure the 'Shift Settings' tab when creating a new shift, the default option will be chosen for half-day leave handling.
8. Click Save.
Common Issues/FAQ
Q: Why can't I click the 'Save' button?
A: Please ensure all the mandatory fields have been filled in.
Q: Can I edit the timing of the shifts later on?
A: Yes, the shift timing can be edited. However, if shifts/schedules have been previously assigned, the manager may need to reset the roster to see the shift changes reflected in the employee's schedule.
Q: Can I assign more than one tag to a shift?
A: Yes. The Tag field under Shift Assignments is a multi-select — you can assign as many tags as apply to a single shift. This is especially useful if the shift needs to be linked to more than one shift premium or deduction rule.