![brioHR-logo-color.svg]](https://support.briohr.com/hubfs/brioHR-logo-color.svg)
Audience & Scope
Audience: HR Admin
Module: Time Attendance, Payroll
Country: Global
Pre-requisites: User group settings (Access to Admin Settings and HR Admin Permission for Time Attendance Module & Payroll Module)
Each month, employees’ overtime hours are converted into overtime payment, typically included in their monthly salary.
-
For hourly-paid employees, the system carries their total hours worked to payroll and automatically calculates the payment based on the hourly rate.
-
For salaried employees, approved overtime hours are added to their salary calculation as per company policy.
Managers or HR must ensure that approved timesheets are sent to payroll so the brioHR payroll system can capture the overtime hours and convert them into payment. This is usually done at the end of the month before payroll processing starts.
IMPORTANT:
Once the overtime and total working hours from the Time Attendance Timesheet are sent to payroll, they cannot be modified.
Step by Step Guide: Sending Employees' Approved Timesheet to Payroll
Default Timesheet Status Sequence
(after publishing the employee's roster)
Open → Approved → Sent to Payroll → Paid
1. Hover over HR Lounge then click into Time Attendance
2. Click into Timesheets
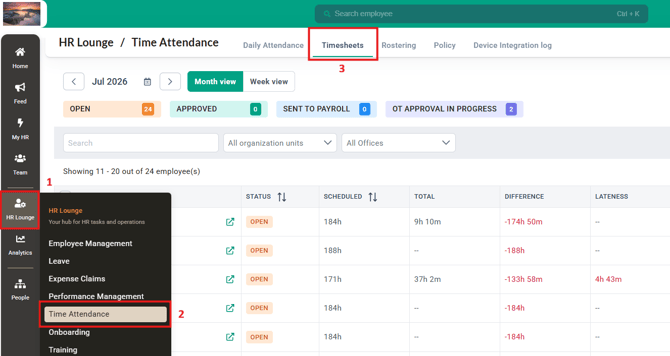
Send Timesheets for the Entire Month
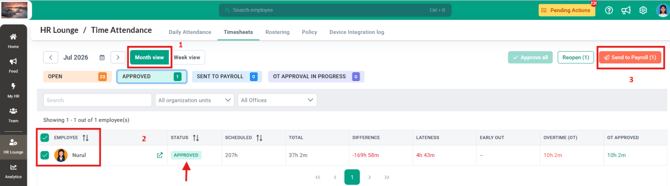
1. Click Month View.
2. Click the Approved status to filter the approved timesheets.
3. Select one or more employees.
4. Click Send to Payroll.
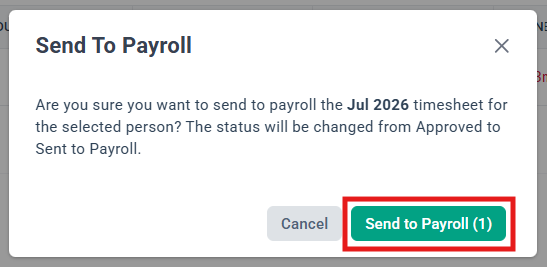
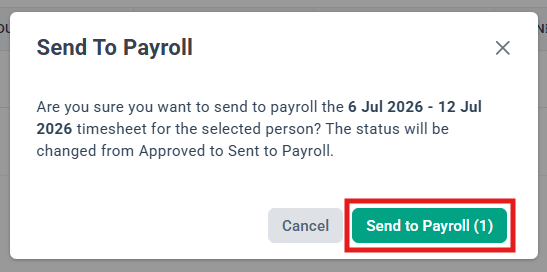
5. A confirmation pop-up appears to confirm sending the entire month's timesheet to payroll.
6. Click Send to Payroll to confirm.
7. The status changes to Sent to Payroll.
Send Timesheets for Specific Week Only
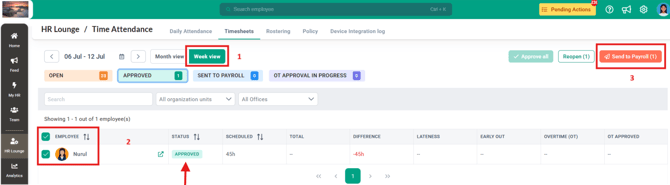
1. Click Week View,
2. Click the Approved status to filter the approved timesheets.
3. Select one or more employees.
4. Click Send to Payroll.
5. A confirmation pop-up message appears to confirm sending the specific period (e.g., 7 Jul - 13 Jul 2025 ) to payroll.
6. Click Send to Payroll to confirm.
7. The status changes to Sent to Payroll.
NOTE:
You are sending the approved timesheet for specific period only and not for the rest of the weeks. If you want to send for entire month, please refer to section above: Send Timesheets for the Entire Month.
What Happens After Sending to Payroll?
The timesheet sent to payroll will be processed during the payroll cycle in the Payroll module for payment calculation.
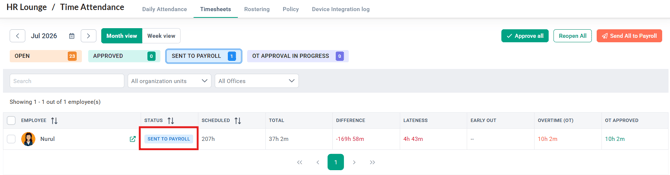
1. The employee Timesheet will appear with the status ' Sent to Payroll'
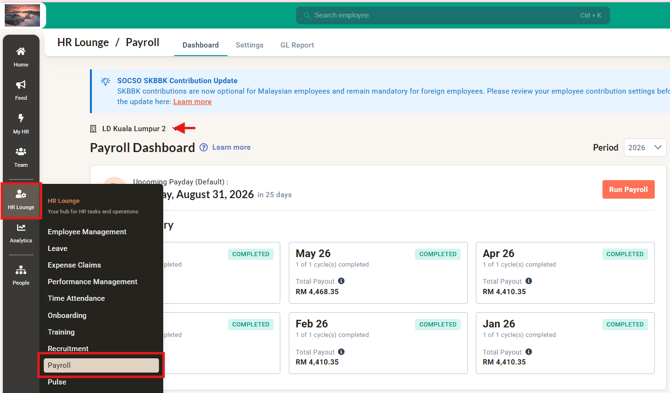
2. Click into HR Lounge > Payroll module, then into the selected Payroll Center
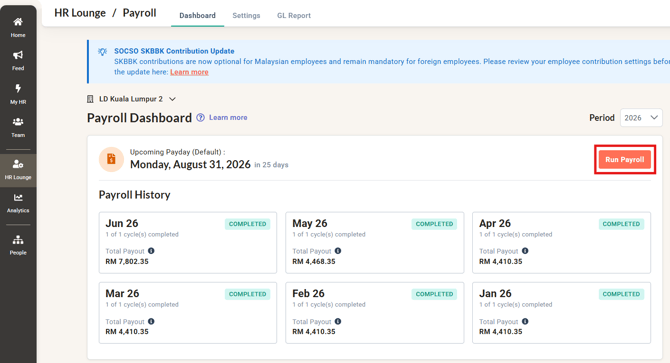
3. Click Run Payroll, then select the payroll cycle to be run (in this example, July 2026)
4. Within the first stage of payroll, Adjust Payroll : Click into Timesheets
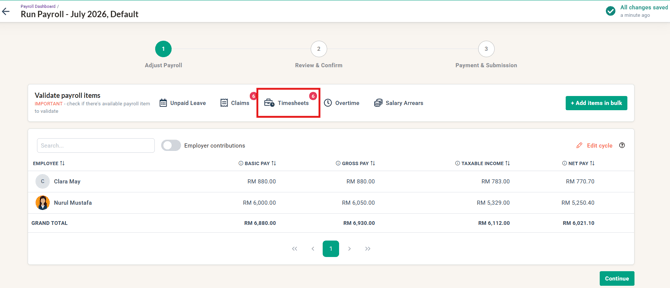
5. All items relevant for the employee will be captured within this dropdown; Overtime payitems and Shift Premiums/Deductions too.
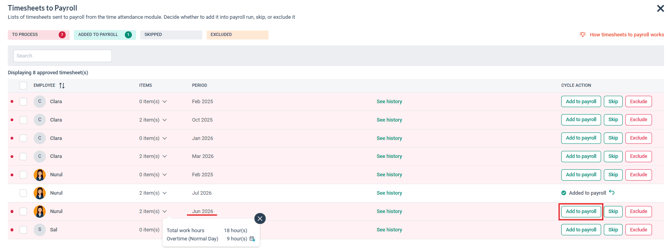
Select the Timesheet, then click Add to Payroll for timesheet to be processed in current month payroll cycle.
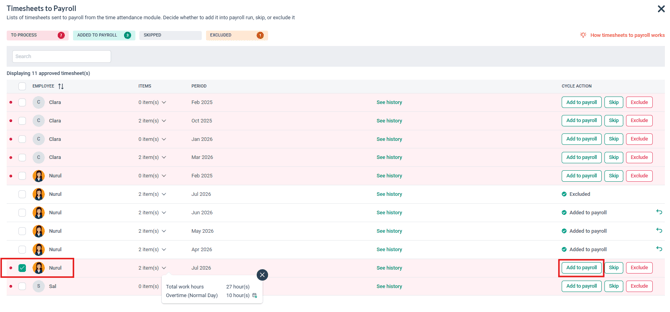
NOTE:
If a timesheet spans more than one calendar month (for example, a weekly timesheet that crosses month-end), both Overtime and Shift Premium/Deduction items are broken down and labelled by the calendar month the underlying dates fall in, with each month's portion calculated using that month's own rate.
6. Once Added to Payroll, the cycle action will indicate Timesheet has been added to payroll. Close the pop-up and return back to payroll page
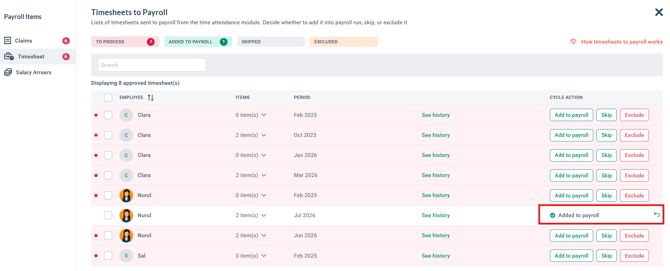
7. In this example, the Overtime payitem is automatically captured within the payroll
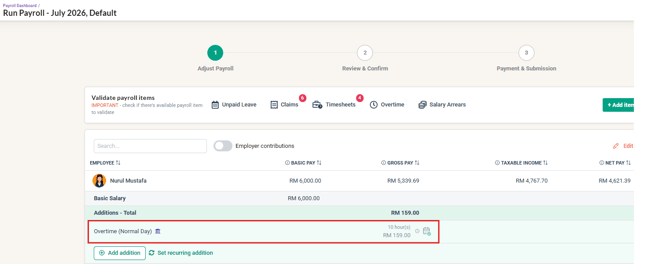
Previous months Timesheet data can be sent over to Payroll to be processed.
The same month-by-month breakdown described below applies to both Overtime and Shift Premium/Deduction items.
1) Add the previous month's timesheet data to payroll
2) Previous months' data will appear in payroll as screenshot below:

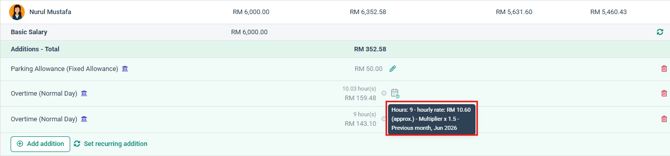
Here is the view of all previous months' timesheet data included in payroll — this includes Overtime, Shift Premium and Shift Deduction items.
*Green icon: Current Month timesheet data
*Blue icon: Previous Month timesheet data
*Red icon: Month before that data (Timesheet month included)
*Purple icon: Month before that data (Timesheet month included)
8. The Payroll Processor can proceed with the payroll as per usual and complete the cycle once all information is confirmed and accurate.
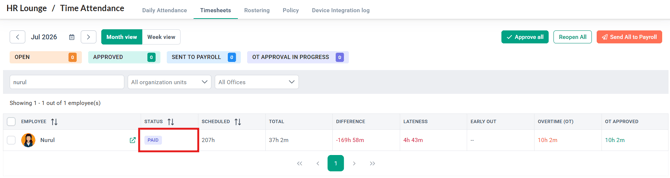
9. As soon as the Payroll Cycle is completed, the status of the employee's Timesheet will be updated to 'Paid'.
Previous months Unpaid Leave data can be added into Payroll.
1) Add the Unpaid Leaves payitem into payroll
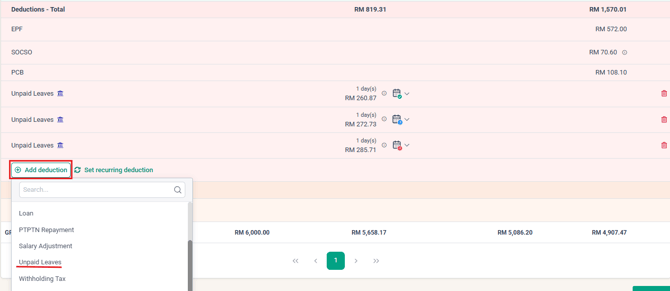
2) Add the days

3) Click on the dropdown and select if the Unpaid Leave is from a previous month, the amount will be automatically calculated
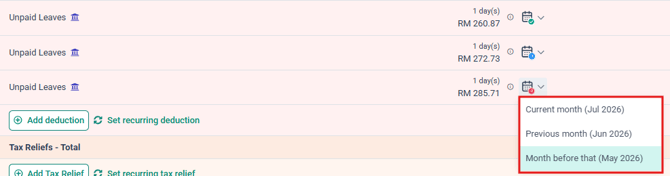
Here is the view of all unpaid leave options that can be included into payroll
*Green icon: Current Month unpaid leave
*Blue icon: Previous Month unpaid leave
*Red icon: Month before that unpaid leave
The formula is automatically captured for current and previous month selection made.
NOTE:
- This source-month grouping only appears when a timesheet actually spans more than one calendar month. A timesheet that falls entirely within one month is displayed as a single list, with no dividers, exactly as before.
- Within a group, items are listed in this order: Overtime, then Shift Premiums (shown in green), then Shift Deductions (shown in red). The Total work hours row is shown once at the top and does not carry a month icon.
TIP:
When you add a pay item whose unit is Hours or Days manually in a payroll run, a source month selector lets you choose which month the quantity relates to: the current month, the previous month, or two months back.
Frequently Asked Questions (FAQ)
Q1: Why does the employee's timesheet status remain "Open" even after I've approved and sent it to payroll?
A1: This usually happens when the employee's rostering for the month/week has not been published yet. Publishing rostering is a crucial step to ensure the timesheet status updates correctly.
Learn more: How HR/Admin Manage Rostering of All Employees
Q2: Can I modify the timesheet after it has been sent to payroll?
A2: No. Once it has been sent to payroll, the system locks the timesheet and you are not able to modify it. If you wish to modify the timesheet, you would need to do several steps:
- In the payroll cycle, exclude the timesheet (this will sent the timesheet from payroll back to time attendance)
- The status changes from Sent to Payroll to Approved (in Time Attendance Timesheet page)
- Reopen the Approved status Timesheet
- You can modify the timesheet as usual.
Q3: Why do I see the same Shift Premium or Shift Deduction listed twice in a payroll run, with different hours?
A3: This happens when the underlying timesheet spans two calendar months (for example, a weekly timesheet that crosses month-end). The item is split into a portion for each calendar month the dates fall in, each labelled with its source month and calculated using that month's own rate. This is expected and mirrors how Overtime has always been handled — it's not a duplicate entry.
Ownership
By: Arveena