![brioHR-logo-color.svg]](https://support.briohr.com/hubfs/brioHR-logo-color.svg)
Audience & Scope
Audience: HR and admin teams setting up brioHR for the first time
Module: Expense Claims
Country: Malaysia, Singapore
Pre-requisites: Implementation kick-off meeting with your Implementation Manager (IM) completed; the Expense Claims migration template from your IM; Employee List loaded and verified (Profile & Dashboards)
This article is part of the Expense Claims data migration series. It follows the Expense Claims Data Migration Guide (PDF).
How claims work in brioHR
The journey of a claim
Every claim follows the same steps. On the left is what happens to the claim; on the right is the part of your template that decides it.
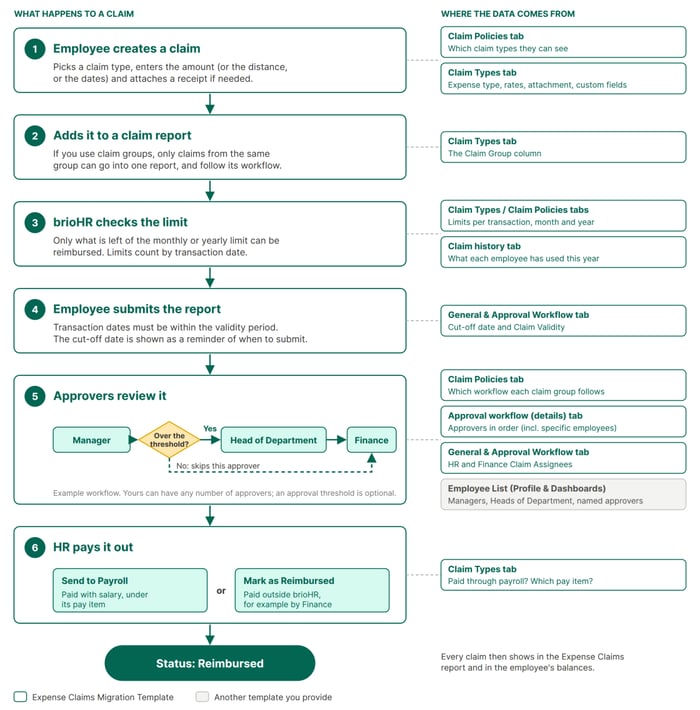
How a claim moves through brioHR, and the template tab behind each step.
Follow one claim from start to finish
Here is one claim at Bayu Tech, a fictional company. Nurul works in the Sales department at Head Office, and in October (after go-live) she goes on a two-day site visit.
| Step | What happens | Why: the data behind it |
|---|---|---|
| 1. Creates the claims | Nurul opens Expense Claims and sees Meals (Travel), Mileage, Medical and Phone. She adds a Mileage claim for 150 km, and brioHR works out 90. She adds a Meals (Travel) claim for 6 to 7 October, and brioHR works out 120 for 2 days. | She has been assigned to the Sales Policy, which includes all four claim types. Mileage is paid at 0.60 per km and Meals (Travel) at 60 per day for Head Office (Claim Types tab). |
| 2. Adds them to one report | She puts both claims in one claim report, "Site visits Oct". | Both claim types are in the Business Travel claim group. |
| 3. brioHR checks the limit | Mileage has a monthly limit of 800. Her September mileage doesn't count towards October, so the full 90 can be claimed. | Limits come from the Claim Types and Claim Policies tabs. Her September mileage came in through the Claim history tab, and is counted in September by its transaction date. |
| 4. Submits the report | She submits on 8 October, before the cut-off date (the 20th) shown on her Expense Claims page, so it is in time for October's claims run. | The cut-off date reminds employees when to submit, and Claim Validity sets how far back a transaction date can be (General & Approval Workflow tab). |
| 5. Approvers review it | The report goes to her manager, who approves it. The total (210) is below the Head of Department's approval threshold of 3,000, so it skips the Head of Department and goes to Finance. Either Mei Ling or Ravi can approve it. | The Sales Policy uses Travel WF for the Business Travel group (Claim Policies and Approval workflow (details) tabs). Her manager comes from the Employee List; Mei Ling and Ravi are the Finance Claim Assignees. |
| 6. HR pays it out | HR sends the approved report to payroll with October's claims. The 210 appears on Nurul's October payslip under "Expense Claims", and the report shows Reimbursed. | Both claim types are paid through payroll under the Expense Claims pay item (Claim Types tab, payroll columns). |
How your setup fits together
Behind every claim is a setup that is built in three stages. These are the same three stages the Expense Claims Starter Guide walks you through, and your template provides the data for all of them.
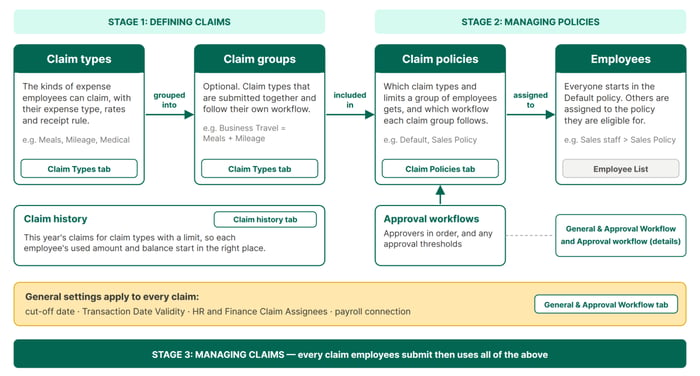
How claim types, claim groups, claim policies and employees connect, and where each comes from in your template.
A closer look: claim policies
Claim policies are where your whole setup comes together: they decide which claim types each employee sees, how much they can claim, and who approves it. Here is what you provide for them, what they power, and what can go wrong.
| Claim policies and limits | |
|---|---|
| What to provide | On the Claim Policies tab, one row per policy: its name, who is eligible (by office, department, job title, job grade, employment type or gender), which claim types and limits it includes, and which approval workflow it uses for each claim group. Also tell your IM which employees belong in each policy, and which employees don't make claims at all (they can be set to Not applicable). If one policy with the same limits and workflow fits everyone, you can skip this tab: your claim types and limits from the Claim Types tab become your default policy. |
| What it powers |
|
| What goes wrong |
|
🔗 Related articles:
What happens after your data is migrated
Once you send your template to your IM, your claim setup is migrated into brioHR. Before employees start claiming, you then:
- Check that the data landed correctly. the data verification articles show you how, setting by setting.
- Walk through your claim journeys. Using your settings and reports, check that each type of claim would reach the right approvers and stay within the right limits. You don't create any claims to do this: claims can't be deleted in brioHR, only cancelled.
- Sign off. Raise every difference with your IM, and go live when everything matches. Then keep an eye on the first real claims.
← Previous: Understanding the Expense Claims Data Migration Process
Next: What to Prepare Before Filling In Your Expense Claims Template →
Back to Expense Claims Data Migration and Verification: Start Here
Ownership
By: Aqilah