![brioHR-logo-color.svg]](https://support.briohr.com/hubfs/brioHR-logo-color.svg)
Audience & Scope
Audience: HR and admin teams setting up brioHR for the first time
Module: Expense Claims
Country: Malaysia, Singapore
Pre-requisites: Implementation kick-off meeting with your Implementation Manager (IM) completed; Expense Claims data migrated by your IM
This article is part of the Expense Claims data verification series. It follows the Expense Claims Data Verification Guide (PDF).
Welcome back!
Your claim settings, approval workflows, claim types, claim policies and claim history are now in brioHR. Before employees start submitting claims, let's confirm everything landed the way you intended, and walk through how each type of claim will flow through your approval workflows. This guide shows you exactly what to check, how to walk through the claims your employees will make, and where to look when something doesn't match.
Key terms
Claim Request page: The main Expense Claims page for HR (HR Lounge > Expense Claims), where you see every claim report and can filter by status, period and claim type.
Claim status: Where a claim report is in its journey: Open (saved but not submitted), Submitted, Approved, Rejected, Cancelled or Reimbursed. Open, submitted, approved and reimbursed claims all count towards the employee's limits.
Expense Claim Balances report: A report showing each employee's limit, amount used and remaining balance by claim type, as of a date you choose.
Verify your data, step by step
Keep your submitted Expense Claims Migration Template open next to brioHR so you can compare as you go.
Step 1: Check your claim settings
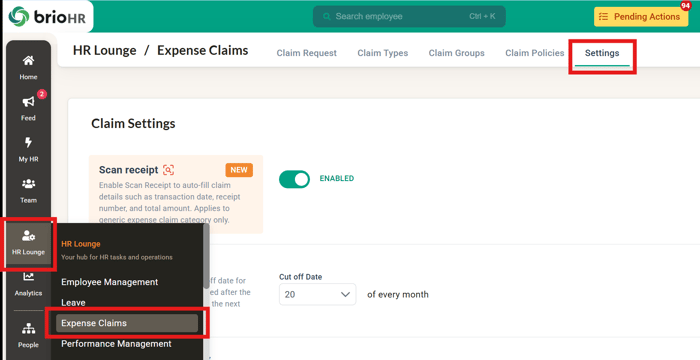
- Go to HR Lounge > Expense Claims > Settings.
- Confirm the Cut-Off Date matches the Claims Cut off date on your General & Approval Workflow tab.
- Confirm Transaction Date Validity matches your Claim Validity. If you left it blank in the template, confirm with your IM whether it should stay off.
- Under Claim Assignees, confirm the HR and Finance people match the names you gave. Each of them needs access to the Expense Claims dashboard in HR Lounge.
- If you pay claims through payroll, check the Payroll Connection has a pay item for every payroll center (by default, "Expense Claims").
- If you chose to use ScanReceipt (OCR), check it is switched on.
Click into HR Lounge > Expense Claims > Settings
🔗 Related articles
Step 2: Check your claim types and claim groups
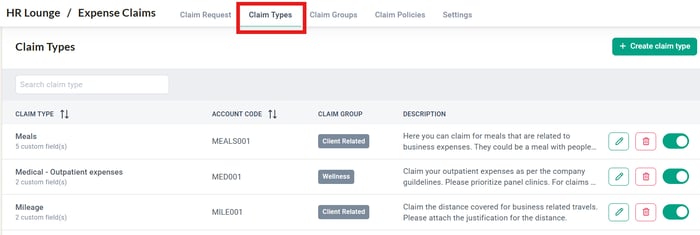
- Go to HR Lounge > Expense Claims > Claim Types. Check that every claim type on your Claim Types tab is listed, with nothing extra (such as the template's example rows).
- Open (click edit) each claim type and compare it with your template: name, description, account code, claim group, expense type, whether an attachment is required, and any custom fields.
- For Mileage claim types, check the rate per km for each office. For Per Day Allowance claim types, check the rate per day for each office and the currency.
- For each claim type paid through payroll, open Payroll Connection and check the pay item. A claim type with no custom pay item is paid under the general pay item from Step 1.
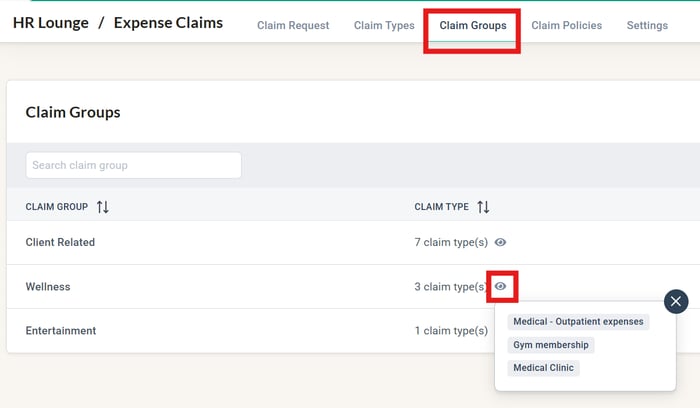
- Go to HR Lounge > Expense Claims > Claim Groups and check each group contains exactly the claim types you intended.
Click into HR Lounge > Expense Claims > Claim Types
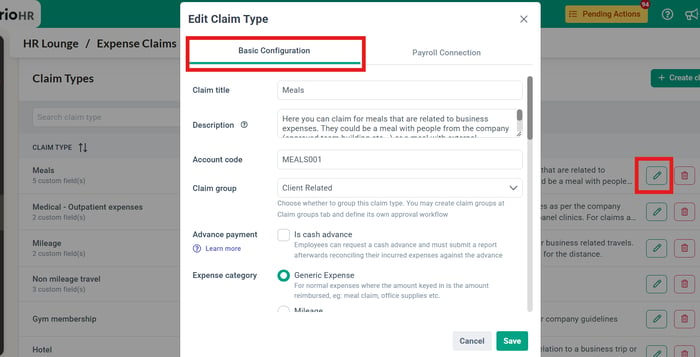
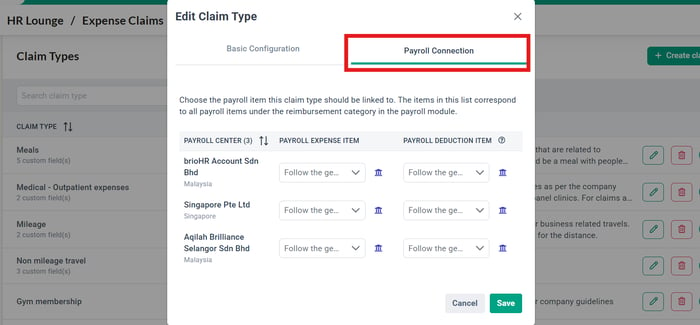
Click into HR Lounge > Expense Claims > Claim Groups
🔗 Related articles
Step 3: Check your claim policies, limits and assignments
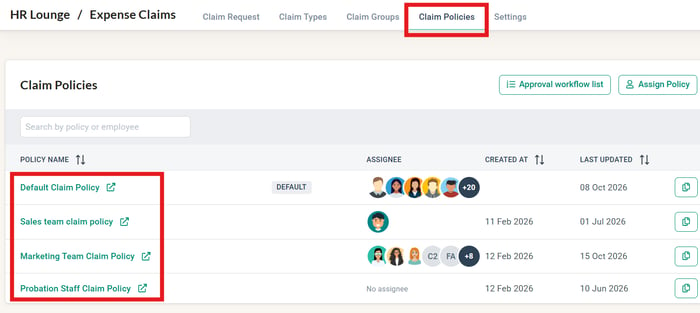
- Go to HR Lounge > Expense Claims > Claim Policies. Check every policy from your Claim Policies tab is there, and that the right one is labelled Default.
- Open each policy and check its eligibility (office, department, job title, job grade, employment type or gender). Eligibility decides which policies can be chosen when an employee is assigned; it doesn't assign anyone.
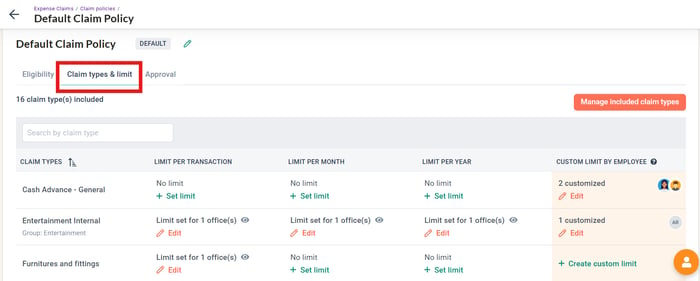
- On the policy's Claim type & limit tab, check every claim type the policy should include is listed, and that the limit per transaction, per month and per year match your template. Check any office-specific limits and any custom limits for individual employees.
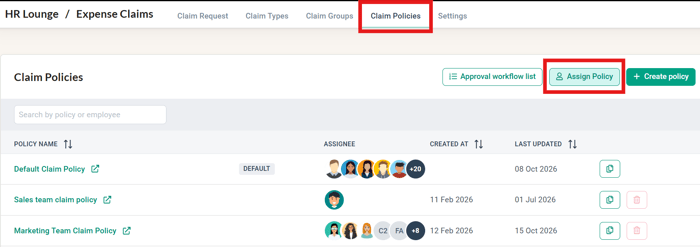
- Click Assign Policy and check every employee who makes claims is in the right policy. Everyone starts in the Default policy and is not moved automatically, so check that employees who need a different policy have been assigned to it. Check that employees who don't make claims are set to Not applicable, and that no one who should make claims is. Use the filters (for example by department or office) to check a whole group at once, and include recent new joiners.
- Look for a warning icon next to a policy. It means one or more employees in it don't meet the policy's eligibility.
Click into HR Lounge > Expense Claims > Claim Policies > choose a policy > Claim type & limit
Click into HR Lounge > Expense Claims > Claim Policies > Assign Policy
🔗 Related articles
← Previous: How to Fill In the Claim Policies and Claim History Tabs, and Send Your Template
Next: How to Verify Expense Claims Approval Workflows, Access and Claim History →
Back to Expense Claims Data Migration and Verification: Start Here
Ownership
By: Aqilah