![brioHR-logo-color.svg]](https://support.briohr.com/hubfs/brioHR-logo-color.svg)
Claim Policies allow you to define the claim type, limit, and approval workflow that applies to specific employees.
This article provides a comprehensive guide on how to create, configure, and assign claim policies effectively.
Steps Covered in This Article:
A. Create a Claim Policy
B. Configure a Claim Policy
C. Assign a Policy
A. Create a Claim Policy
Login to your BrioHR account:
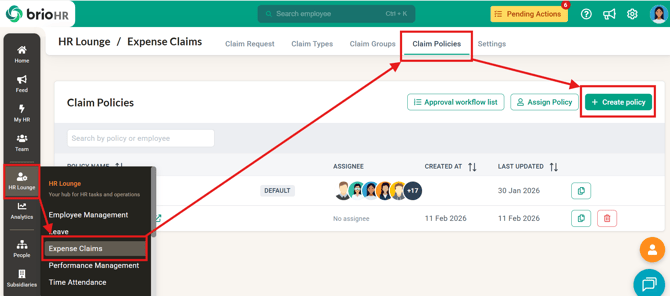
- Go to HR Lounge.
- Navigate to Expense Claims.
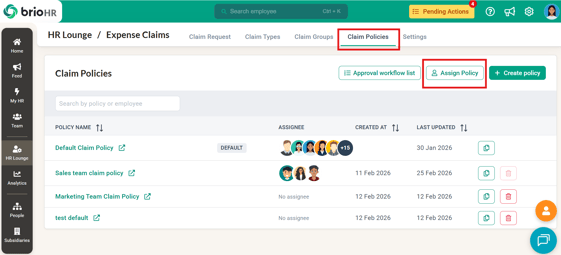
- Click on Claim Policies.
- Select the + Create Policy button to create a new claim policy.
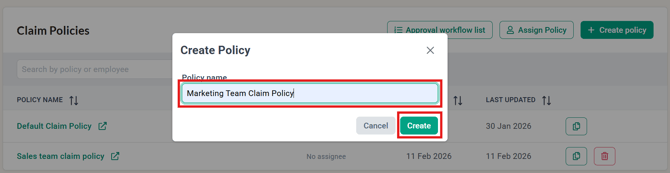
- Enter the Policy Name (e.g., Marketing Department Policy) and click Create.
B. Configure a Claim Policy
- Click on the new claim policy you just created on the Claim Policies page.
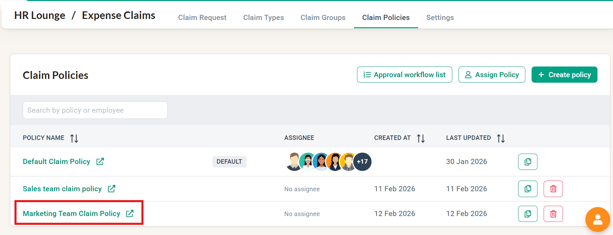
- A new tab will open where you can configure the settings for the new policy.
Policy Eligibility
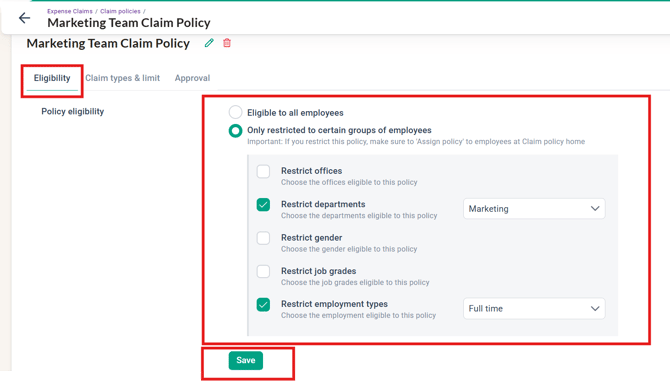
The first section is Policy Eligibility. This allows you to decide who is eligible for the policy.
- Eligibility Options:
- Eligible to all employees
- Restricted to certain groups of employees (e.g., specific office, department, gender, job grade, or employment type)
Claim Types & Claim Limits
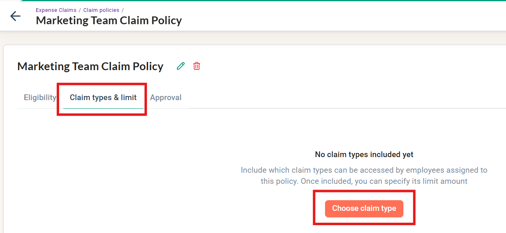
The second section covers Claim Types & Claim Limits. This allows you to link claim types to the policy and set claim limits for all employees and specific employees assigned to this policy.
- Include Claim Types in this Policy:
- Click on the Choose Claim Type button.
- Select the checkbox next to the specific claim type you wish to link.
- Click Save once done.
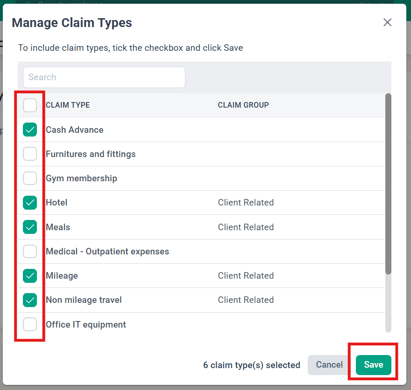
- Click on the Choose Claim Type button.
Whenever you create a new claim type, ensure it is added to the relevant claim policy — HR Lounge > Expense Claims > Claim Policies > open the employee's policy > Claim Types & Claim Limits > Choose Claim Type > tick the type > Save. Until then, the claim type does not appear when submitting: it will not show in the claim drop-down menu for employees.
For troubleshooting missing claim types, refer to [this article]
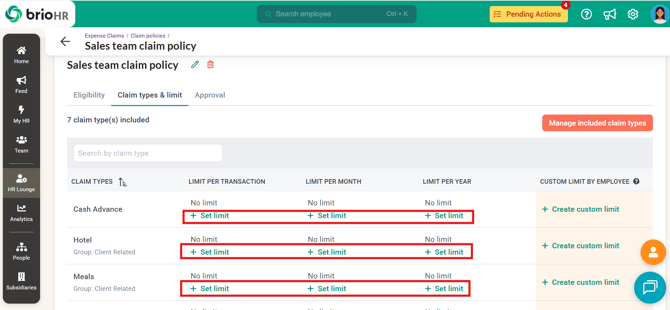
- Set Claim Limits Applicable to all employees assigned to this policy:
- Click on the + Set Limit button under Limit per Transaction/Month/Year.
- Choose a limit type:
- No limit
- Follow default policy (click the eye icon to check the limit in the default policy)
- Set a specific limit (input the maximum limit amount and assign it to specific offices)
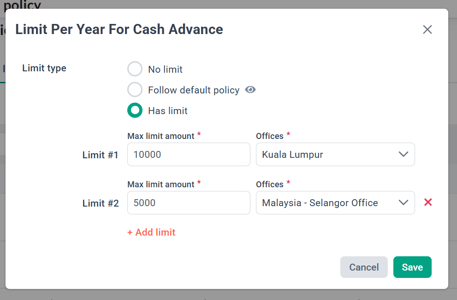
- Click on + Add Limit if you need to set different limits for different offices.
- Click Save once done.
- Click on the + Set Limit button under Limit per Transaction/Month/Year.
- Set Claim Limits for Specific Employees (customize per employee per claim type):
- Click on + Create Custom Limit under Custom Limit per Employee.
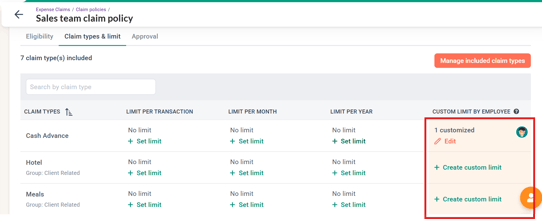
- Set limits under Limit per Transaction/Month/Year.
- Click Apply and then Save Customization once done.
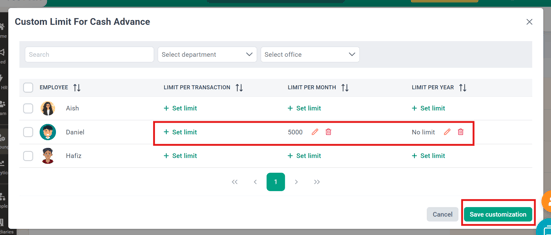
- Click on + Create Custom Limit under Custom Limit per Employee.
Note:
Before you create custom limit, please ensure that the employee you want to apply the custom limit for is assigned to the claim policy. If not, you will not be able to choose the employee to set the custom limit. See part 'C. Assign a Policy' below on how to assign claim policy to employee(s).
Approval Workflow
The third section is Approval Workflow, where you can select the approval workflow for all employees and specific employees assigned to this policy.
- Select the Approval Workflow for all employees assigned to this policy:
- Click the Edit button under the Approval column for Non-grouped Claims and Grouped Claims (if you have created a claim group).
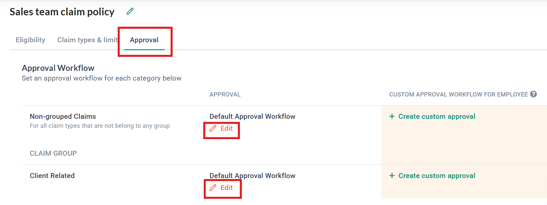
- Select the appropriate approval workflow.
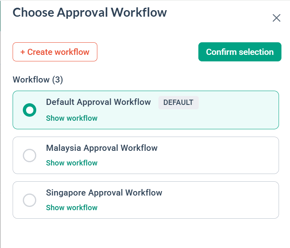
- Click Confirm Selection once done.
- Click the Edit button under the Approval column for Non-grouped Claims and Grouped Claims (if you have created a claim group).
NOTE 1:
If the existing approval workflow does not meet your needs, click on + Create Workflow to create a new approval workflow. You can set the first approver, add more approvers, and establish a threshold if applicable. For more details on setting a threshold amount for claim approval workflows, click here.
NOTE 2:
Before you create custom approval, please ensure that the employee you want to apply the custom approval for is assigned to the claim policy. If not, you will not be able to choose the employee to set the custom approval. See part 'C. Assign a Policy' below on how to assign claim policy to employee(s).
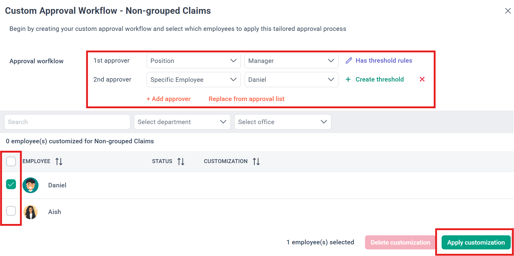
- Set the Approval Workflow for Specific Employees:
- Click on + Create Custom Approval under the Custom Approval Workflow for Employees.
- Decide who the first approver is, and click + Add Approver if more approvers are needed.
- Select the checkbox next to the specific employee that needs to follow this custom approval workflow.
- Click Apply Customization once done.
NOTE:
You can use the 'Replace from Approval List' button if you wish to use an existing approval workflow from the list.
C. Assign a Policy
- Click on the Assign Policy button on the Claim Policies page.
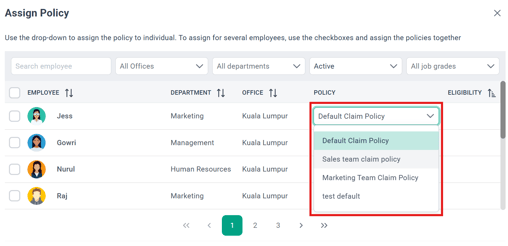
- Change Policy for an Individual Employee:
- Click on the dropdown list under the Policy column for the specific employee.
- Select the policy you wish to assign to this employee.
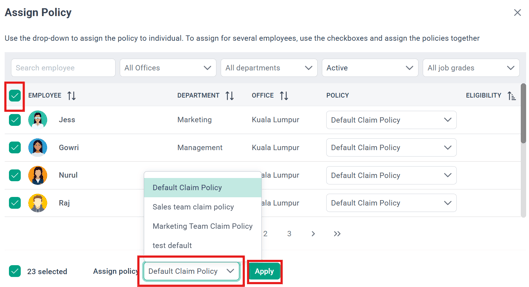
- Change Policy for All Employees:
- Select the checkbox next to the employee(s).
- Click on the dropdown list beside Assign Policy.
- Choose the policy and click Apply.
NOTE:
Existing claim module users are automatically assigned to the Default Claim Policy. Newly created employees will also be automatically assigned to the default claim policy if they do not meet the eligibility criteria of other policies.
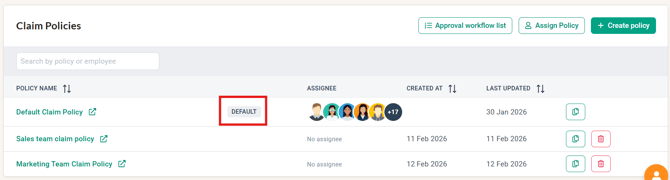
The 'default' policy will have the "Default" label at the claim policies list. The default is the first policy that has the 'Eligibility' set to 'Eligible to all employees'. If there are multiple claim policies set to be 'eligible to all employees', the top policy will remain the default.
Frequently Asked Questions (FAQs)
Q: Can I reset the yearly claim limit?
A: Claim limits follow the calendar year and cannot be manually reset.
Q: Workaround for special cases — a custom limit per employee:
1. Go to HR Lounge > Expense Claims > Claim Policies and open the employee's policy.
2. In Claim Types & Limits, add a custom limit by employee for the specific claim type.
3. Set the custom limit for the employee for "limit per year".
4. Once the new year starts, remember to remove the customization so the previous year's custom limit no longer applies.
Q: An employee cannot submit a claim at all — why?
A: Check the policy's Eligibility tab: if the employee doesn't match the criteria (e.g. an office restriction), the policy doesn't apply to them. A warning icon on a claim policy means one or more assigned employees are not eligible under its criteria.
Q: How can I verify a claim's submission date beyond the claim history?
A: Go to Analytics > Report Builder and create an expense claim report — the submission date is a report field.
Q: Can claims be disconnected from payroll?
A: Claims do not flow to payroll automatically. A claim only reaches payroll when an HR/Admin uses the 'Send to Payroll' action on the claim report. If you do not use 'Send to Payroll', the claim stays in the Expense Claims module and is not included in any payroll run.
Need Assistance?
If you have any questions or require assistance, please reach out to our support team via live chat or email us at support@briohr.com.