![brioHR-logo-color.svg]](https://support.briohr.com/hubfs/brioHR-logo-color.svg)
Audience & Scope
Audience: HR and admin teams setting up brioHR for the first time
Module: Expense Claims
Country: Malaysia, Singapore
Pre-requisites: Implementation kick-off meeting with your Implementation Manager (IM) completed; the Expense Claims migration template from your IM; Employee List loaded and verified (Profile & Dashboards)
This article is part of the Expense Claims data migration series. It follows the Expense Claims Data Migration Guide (PDF).
General & Approval Workflow tab
💡 How to read the field tables
In the "Required" column, Compulsory and Fill in fields must be filled in; If applicable fields only if they apply to you. Replace the template's example rows (for example "Example: Meals") with your own data before you submit.
Fill in the default approval workflow if you have only one workflow for everyone. If you have more than one, still fill in your most common workflow here, and add the others on the next tab. The default workflow only offers Manager, HR and Finance, so if your workflow includes a Head of Department or a specific employee, describe it on the Approval workflow (details) tab instead. Only fill in Claim Assignees if HR or Finance is an approver in any of your workflows.
| Field | Required | Notes |
|---|---|---|
| Claim settings | ||
| Claims Cut off date | Fill in | The day of the month, for example 15. It is shown on the Expense Claims page as a reminder of when to submit claims. Admins can still process claims submitted after it. |
| Claim Validity (# of month) | If applicable | How many months back an expense can be claimed, for example "2 months" (an employee submitting on 22 August then cannot choose a February transaction date). The template says to leave it blank if you are unsure. In brioHR this is Transaction Date Validity. |
| Approval Workflow (Default) | ||
| First Approver | Compulsory | Options: Manager, HR or Finance. |
| Second Approver | If applicable | Options: Manager, HR or Finance. |
| Third Approver | If applicable | Options: Manager, HR or Finance. |
| Claim Assignees | ||
| If approver is from HR (full name) | If applicable | Full name as on the Employee List. You can list more than one person, separated by commas. Only one of them needs to approve each claim. |
| If approver is from Finance (full name) | If applicable | Full name as on the Employee List, for example "Yati, Elizabeth". Only one of them needs to approve each claim. |
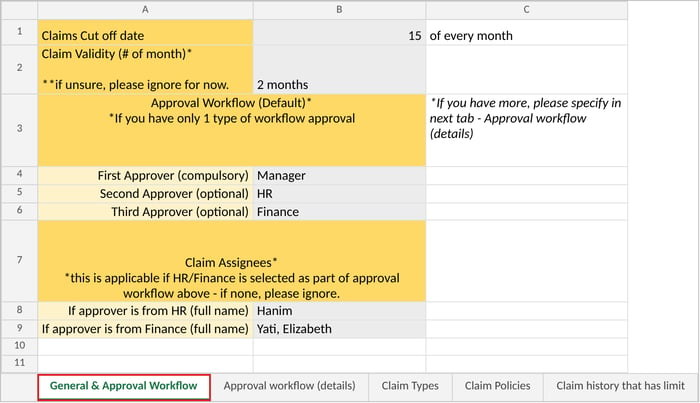
Sample of the General & Approval Workflow tab:
🔗 Related articles
Approval workflow (details) tab
Use this tab if you have more than one approval workflow, for example different approvers by claim group, job grade, position, department or office. There are two tables side by side: use the left one for workflows without approval thresholds, and the right one for workflows with thresholds. Add one row per workflow. You can have as many approval levels as you need.
Which approvers can you use?
Each step in a workflow is either a position or a specific employee. You can mix them in any order, and there is no limit to the number of steps.
| Approver | Who approves | What it relies on |
|---|---|---|
| By position | ||
| Manager | The employee's direct superior. Each employee's claims go to their own manager. | The Manager Email Address on the Employee List. |
| HR or Finance | Any one of your HR or Finance Claim Assignees. Only one of them needs to approve. | The names in Claim Assignees (General & Approval Workflow tab). |
| Head of an org unit | The head of one of the employee's org units. The choices follow your own org units: if you have two levels, Department and Division, you can choose Head of Department or Head of Division. Head of Direct Unit is the head of whichever org unit the employee is directly in, at any level. | The head set on each org unit. The step is skipped if the unit has no head, or the head is the person claiming. |
| By specific employee | ||
| Specific employee | One named person in your company, the same for everyone who uses the workflow. For example, your General Manager approves all travel claims above an approval threshold. | Their full name exactly as on the Employee List, for example "GM (Aziz)". |
Workflow approval without threshold
| Column | Required | Notes |
|---|---|---|
| Workflow Name | Fill in | A short name you will recognise, for example "WF A". You will use this name on the Claim Policies tab. |
| Description | Fill in | Who the workflow is for, for example "For job grade A". |
| 1st Approver | Fill in | The approver type, for example "Manager (direct superior)". For a specific employee, give their role and full name, for example "GM (Aziz)". |
| 2nd, 3rd, 4th Approver | If applicable | The approver type for each step: Manager, HR, Finance, the head of an org unit (for example HOD for Head of Department), or a specific employee. For a specific employee, give their role and full name in brackets, for example "GM (Aziz)". The template also puts names next to HOD, HR and Finance, for example "HOD (Azlan)", "HR (Anis)", "Finance (Amy)". |
Workflow approval with threshold
| Column | Required | Notes |
|---|---|---|
| Workflow Name, Description, Approvers | As above | As above. Each approver then has the four columns below. |
| Enable threshold | Fill in | Options: Yes or No. Choose Yes if this approver should only see claims above an amount. |
| Threshold type | If applicable | Options: Transaction Level (checks each claim item in the report) or Report Level (checks the total of the claim report). |
| Amount is more than? | If applicable | The amount above which this approver is needed, for example 10000. |
| Applicable to which Offices? | If applicable | All, or the office names exactly as on the Employee List. The threshold only applies to employees in the offices you list. |
Sample of the Approval workflow (details) tab:


🔗 Related articles
← Previous: What to Prepare Before Filling In Your Expense Claims Template
Next: How to Fill In the Claim Types Tab →
Back to Expense Claims Data Migration and Verification: Start Here
Ownership
By: Aqilah