Introduction
Creating tailored leave policies ensures that your company’s leave management reflects the needs of various teams, offices, and employment levels. BrioHR allows you to set up multiple leave policies under one leave type, each with distinct rules and configurations.
For example, you might apply different annual leave rules for employees in your Thailand office versus those in Indonesia, or vary entitlements based on job grades.
Each leave policy is fully customizable and can differ significantly from others.
Learn More: How to Create and Manage Leave Types in BrioHR
Step-by-Step Guide: Create a Leave Policy
Step 1 - Log In to BrioHR Account
Log in to your BrioHR account using your registered credentials.
Step 2 - Access the Leave Module and Policies
1. Go to HR Lounge > Leave.
2. Navigate to Leave Types & Policies.
3. Click View Details for the leave type where you want to add a new policy.
4. Under Policy Configuration, choose one of the following options:
- Duplicate Existing Policy: Quick setup when the new policy shares similar rules.
- Add New Policy : Start from scratch.
Step-by-Step Guide: Configure a Leave Policy (General Configuration)
The leave policy configuration consists of two parts:
- General Configuration: Applies to all employees assigned to this policy.
- Custom Configuration: For exceptions or employee-specific rules.
Step 1 - Configure Policy Availability
This section defines who can be assigned to a specific policy.
Note that setting availability does not automatically assign employees — you’ll still need to manually assign the policy.
You can make the policy:
- Available to all employees: Assign this policy to anybody in the company.
- Only available to certain groups of employees: Restrict this policy to a certain group of employees only such as:
- Offices
- Departments
- Gender
- Job Grades
- Employment types
This restriction simplifies policy assignment when new employees join.
Step 2 - Configure the Leave Approval Process
When employees apply for leave, you can set an approval flow of up to two steps.
Each approver receives:
- An email notification and
- A pending approval task in the Pending Actions of BrioHR account
Approval options:
- None: Skip the step (e.g., for single-approver processes)
- Position/Manager: The employee's current manager approves the leave.
- Specific Employee: Assign a fixed approver manually.
IMPORTANT NOTE:
Approval steps are sequential - the second approver only receives the request after the first approval.
Step 3 - Configure the Entitlement Section
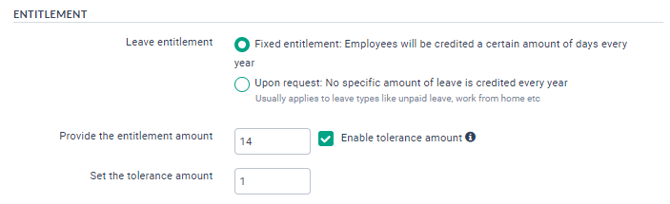
3.1. Leave Entitlement
Choose first if you would like to have a leave entitlement. You have the following choices:
- Fixed Entitlement: Assign a yearly leave quota (e.g., annual leave)
- Input the Entitlement Amount employees are entitled to per year.
- Upon Request: No fixed quota; approval depends on management (e.g., Unpaid Leave)
WARNING:
If you put "0" as the Entitlement Amount (for Fixed Entitlement), the leave type will be hidden on employees' leave dashboard.
The employees won't be able to see the leave type option since they cannot apply for it.
Tolerance (Advance Days)
Enable tolerance if you allow employees to apply leave even with zero balance (negative balance allowed up to the defined limit)
For example, if you choose a tolerance of 1, then the employee can still book 1 day if they have a leave balance of 0. This way, they will have a -1 leave balance until they earn new leaves. The way leave is earned is described in the next section.
Tip:
Enable the Tolerance Amount feature in the Leave Policy settings to allow employees to apply for leave up to a set limit even when the balance is insufficient.
3.2. Earned Leave
Earned leave allows you to set up leave to follow the accrual process throughout the year.
There are two types of earned leave:
- Daily Basis: The leave days are accrued or earned daily.
- Calculation: Entitlement / 365 days
- Monthly Basis: The leave days are accrued or earned monthly.
- Calculation: Entitlement/ 12 months
3.2. Prorated Leave
Enable if entitlement should be adjusted for employees:
- Joining mid-year
- Leaving mid-year
Setting configuration:
- Enabled: The employees' entitlement is calculated based on the number of days/months they have worked in the company within the year. For example, applies to annual leave.
- Disabled: Full entitlement is given to the employees regardless they work full one year or not. For example, applies to replacement leave.

Modes available:
- Yearly Basis: Prorate by Started, Completed, or Partial months.
- Monthly Basis: Prorate by percentage per month.
3.3. Carry Forward Settings
Set rules for carrying unused leave into the next year:
- Define a maximum carry-forward limit
- Set an expiry date (e.g, 3 months after the year start, expiry date is 31 March)
BrioHR auto-calculates carry-forward at midnight on December 31, adding them into the initial balances for the new year.
Learn More:

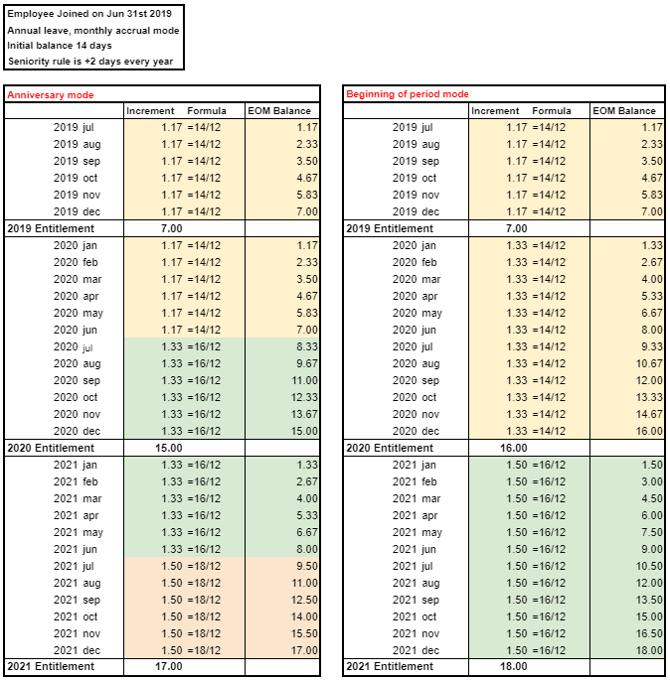
3.4. Seniority (Years of Service)
Increase entitlement based on service duration.
Configure:
- Effective Date:
- Beginning of Period: The incremental entitlement days will apply starting from January, 1st of the year following the employee's anniversary date.
- For example, if the employee joined in Dec 2016, and their entitlement is incremented by 1 day after 2 years of seniority, the employee will have the additional day available in 2019.
- Anniversary: The incremental entitlement days will apply on the anniversary day of the employee.
- On the anniversary date, the employee will be switching entitlement days during the year.
- Therefore, their yearly entitlement will be prorated between before and after the increment.
- Beginning of Period: The incremental entitlement days will apply starting from January, 1st of the year following the employee's anniversary date.
- Increment Mode:
- Fixed increment: Define an increment and a frequency that will be applied.
- For example, +2 days every year, capped at 10 days.
- Variable increment: Set how many days to add after a certain number of years.
- For example, +2 days after 3 years, +1 day after 4 years
- Fixed increment: Define an increment and a frequency that will be applied.

Here is an example illustrating of the two modes of calculation methods:
3.5. Rounding Rules
Enable rounding to simplify entitlement calculations.

3.6. Link to Another Leave Type
Share entitlement across multiple leave types.
Example: Link Emergency Leave to Annual Leave so both draw from the same balance.

Step 4 - Configure the Leave Advanced Settings
4.1. Use working days
Determines how leave days are counted:
- Enabled: counts only working days based on employee's office schedule.
- So if an employee does not work on weekends based on their office's configuration, if they book a leave from Friday to Monday, they will be deducted 2 days.
- Disabled: counts calendar days.
- So if they book a leave from Friday to Monday, they will be deducted 4 days. This option is used for exceptional situations such as hospitalization leaves, or maternity leave.

4.2. Allow Booking Half Day
This setting determines whether the system allows employees to book half-day leaves:
- Enabled: employees can apply half-day leave.
- Disabled: only full-day leave allowed.
Learn More: How to Manage Half-Day Leave for Employees
4.3. Allow Employees to Apply for Past Leave
If enabled, employees will be able to apply for leaves on past days. This option can be used for medical leaves, for instance, when employees are not necessarily anticipating taking the leave.

4.4. Allow Employees to Modify Past Leaves

This setting determines whether employees can modify the details of past approved leaves within the current year.
- Enabled: Allow employees to edit dates, justification, and attachment.
IMPORTANT:
- The modification will require an approval process.
- Employees cannot modify the leave type. If required to change the leave type, cancel the current leave and reapply a new leave using the desired leave type.

4.5. Set a Limit of Time for Leave to Be Booked in Advance (Advance Notice)
- Minimum Limit: Choose 'Yes, set a limit' with a limit amount, e.g, 7 days
-
- Employees must apply for leave at least seven (7) days in advance.
- The system will not allow leave to be applied if employees attempt to apply lesser that 7 days' notice.
- Maximum Limit: Choose 'Yes, set a limit' with a limit amount, e.g, 1 month.
- Employees are allowed to apply for leave up to a maximum 1 month in advance

4.6. Set a Limit to the Period that can be Booked at a Time (Consecutive Days)
Restrict how many days can be booked in one application.
For example, if you select 3 days, then a leave which duration exceeds 3 days (excluding non-working days) will not be allowed.

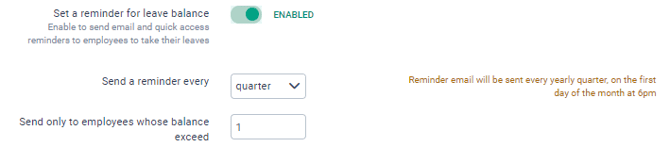
4.7. Leave Balance Reminder
An option to send a notification to all the employees about their leave balance.
Set:
- Frequency of email reminders
- Minimum balance for employees to be included
4.8. Notification for Leave That Has Been Approved
Add emails to receive notifications each time assigned employees' leave have been approved.
This can be a third-party email address, such as HR Operations. You can decide to attach a calendar invitation with the email.
CAUTION:
Do not add the managers/approvers' email addresses. They will, by default will be notified each time their employees apply for leave and require approval.
4.9. Mandatory Attachment/Justification
Require employees to upload supporting documents or add a justification message before submitting their request.

4.10. Custom fields
Collect additional information during leave application. Field types include:
- Text
- Number
- Date
- Dropdown (Select) from

Once all the configurations have been set up, do not forget to click Save Settings to ensure all modifications are captured.
Step-by-Step Guide: Configure a Leave Policy (Custom Configuration)
Use this section when certain employees require exceptions such as:
- Different entitlement
- Special approvers
- Different proration mode
- Custom carry-forward
- Custom advance notice rules
Click on a customization type to start the process. For any customization, you will follow the same process:
- Select the employee(s) to customize and click next.
- Choose the value or setting you would like to apply to them.
- Check the impact of your customization and approve.
NOTE:
The custom configuration made to an employee will supersede the setting of general configuration
CAUTION:
If you change an employee's leave policy, all custom configurations applied to them will be removed.
Learn More:
Need Assistance?
If you have any questions or require assistance, please reach out to our support team via live chat or email us at support@briohr.com.