![brioHR-logo-color.svg]](https://support.briohr.com/hubfs/brioHR-logo-color.svg)
Audience & Scope
Audience: HR and admin teams setting up brioHR for the first time
Module: Leave
Country: Malaysia, Singapore
Pre-requisites: Implementation kick-off meeting with your Implementation Manager (IM) completed; Steps 1 to 5 completed; leave history migrated
This article is part of the Leave data verification series. It follows the Leave Data Verification Guide (PDF).
This article continues the checks from How to Verify Your Leave Types, Policies and Configuration (Steps 1 to 5). Keep your Leave template open next to brioHR so you can compare as you go.
Step 6: Check approvers
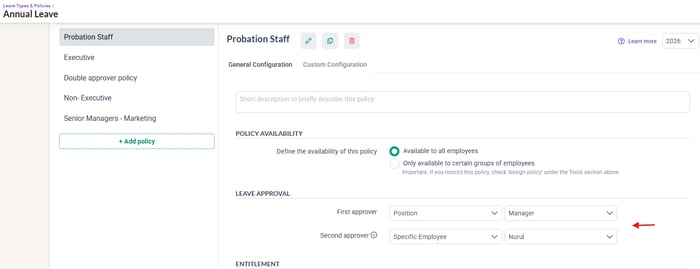
- Confirm the default first (and second, if any) approver in the policy settings > Leave Approval.
- Confirm any per-employee overrides are for the right people.
- If the approver is set to Manager, spot-check the manager field on a handful of employee profiles. Otherwise requests go to the wrong person or nobody.
Open the policy > Leave Approval
Step 7: Check entitlements on each employee's dashboard
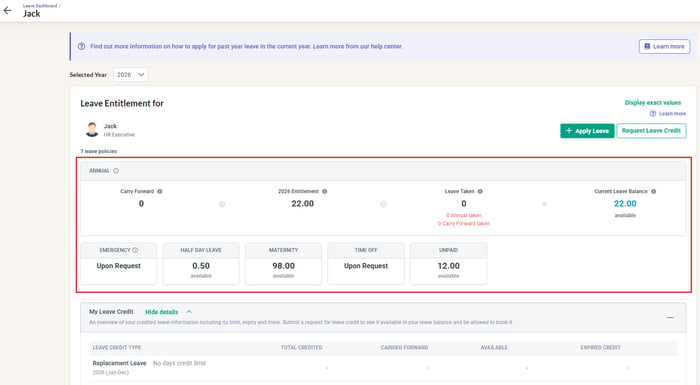
Open the Leave dashboard for a sample of employees (or ask a pilot user to check their own). This is what employees see and rely on from day one. For each leave type, confirm:
- The leave type appears, and only the leave types that employee should have.
- The entitlement matches their policy, including proration for new joiners and any custom entitlement.
- Carry forward and any credit balances show as you expect.
Check the employee's Leave Entitlement on their Leave dashboard
Step 8: Check leave balances after history migration
Once the leave history has been migrated, pick a sample of employees and, for each leave type, compare the balance in the system with your own records:
🔗 The balance check
Leave balance in the system = carry forward at 1 January (plus this year's entitlement and any credits) minus leave already taken this year.
- Choose a mix: a long-serving employee, a new joiner, someone with half-day leave, someone with carry forward, and someone with a credit balance.
- If a balance is off, work out the difference and match it to the causes in If something doesn't match.
Step 9: Confirm the unpaid leave formula
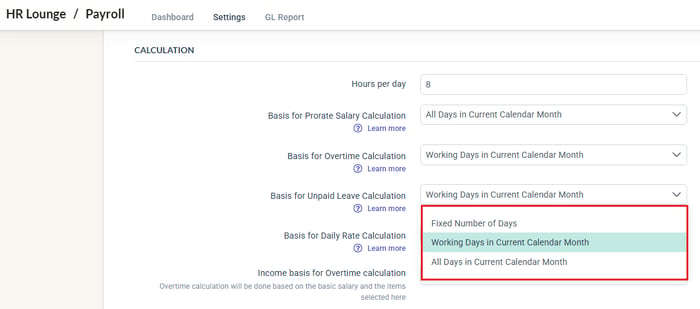
- Go to HR Lounge > Payroll > Settings > General > Calculation > Basis for Unpaid Leave Calculation, and confirm the selection. The system default is Basic Salary ÷ all days in the current calendar month × unpaid days.
- Confirm which formula is actually active. Leave and Payroll settings can differ, and a mismatch causes unexpected deduction amounts.
- Remember that unpaid leave is not deducted automatically. Approved unpaid leave must be added to the payroll cycle each month.
Click into HR Lounge > Payroll > Settings > General > Basis for Unpaid Leave Calculation
Step 10: Pilot test
- Ask one pilot employee and one pilot manager to apply for and approve a leave request.
- Confirm the request reaches the right approver, and the booking rules (half-day, backdating, advance notice, attachment) behave the way your policy says.
Comparing with reports
brioHR's reports are the quickest way to catch mistakes across your whole headcount. Go to Analytics > Report Builder, filter for the leave balance and leave history fields, export, and compare against the tabs you sent. The Leave Balance Report and Leave Utilizations Report can also be downloaded from the Leave dashboard.
| Compare | Against | What to look for |
|---|---|---|
| Leave balance per employee, per leave type | Carry Forward Leave tab, plus entitlement, minus Leaves History | Balances match the balance check in Step 8. |
| Leave history | Leaves History tab | Every leave you listed is there, with the right days, dates and half-day session. |
| Credit balances | Credit Leave Request History tab | Existing credits match, with the right reference date. |
| Leave entitlement per employee, per leave type | Your Leave Policy tab (and any exceptions you listed) | Entitlement matches the policy, including proration for new joiners and any custom entitlement. |
💡 Tip
If you are running a parallel run, compare the opening balance per employee per leave type with your own records as at the same date, and compare the unpaid leave deduction with the formula configured. Your IM can advise on which cycles to run in parallel.
← Previous: How to Verify Your Leave Types, Policies and Configuration
Next: Leave Data: What to Look Out For and What to Do If Something Doesn't Match →
Back to Leave Data Migration and Verification: Start Here
Ownership
By: Aqilah