![brioHR-logo-color.svg]](https://support.briohr.com/hubfs/brioHR-logo-color.svg)
Audience & Scope
Audience: HR and admin teams setting up brioHR for the first time
Module: Profile & Dashboards
Country: Malaysia, Singapore
Pre-requisites: Implementation kick-off meeting with your Implementation Manager (IM) completed; Profile & Dashboards data migrated by your IM
This article is part of the Profile & Dashboards data verification series. It follows the Profile & Dashboards Data Verification Guide (PDF).
Your offices and employee data are now in brioHR. Before you fill in any other template, this guide helps you confirm everything landed the way you intended. Every other module reads from this data, so a small fix now saves a lot of rework later. If a check doesn't pass the first time, that's completely normal. Your Implementation Manager (IM) is there to help.
Key terms
Source file: The Company Data Template and Employee List Template you sent us. You compare brioHR against these.
Employee Information Report: A report that shows all your employee data in one table, so you can compare it with your source file (see Step 3).
User group: Decides what each person can see and do across modules, reports and documents.
Profile Change Request: Lets employees edit their own details, with each change approved by HR before it updates the profile (see Step 8).
Verify your data, step by step
Keep your source file open next to brioHR so you can compare as you go.
Step 1: Check your offices
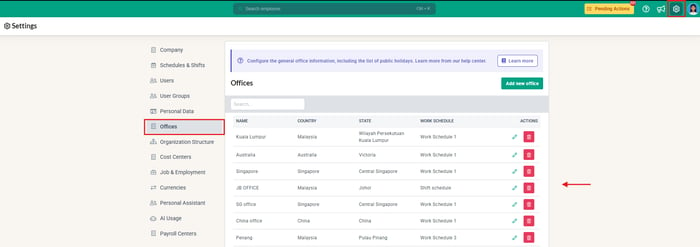
- Go to Settings > Offices in brioHR.
- Confirm every office you listed exists, with the correct state and working days.
- Compare the office names against the Office name column on your Employee List. They must match exactly, including spelling, spacing and punctuation.
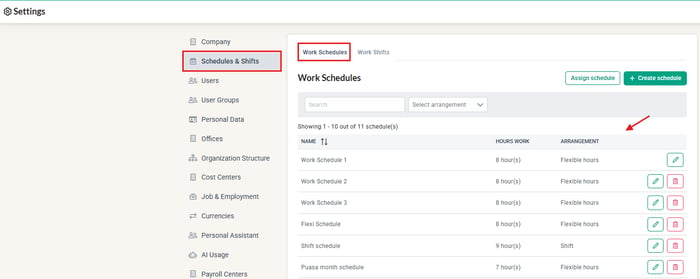
- Check the work schedule configuration under Settings > Schedules & Shifts > Work Schedules.
Click into Settings > Offices to check the office configuration
Click into Settings > Schedules & Shifts > Work Schedules to check the schedules configuration
Step 2: Check your headcount
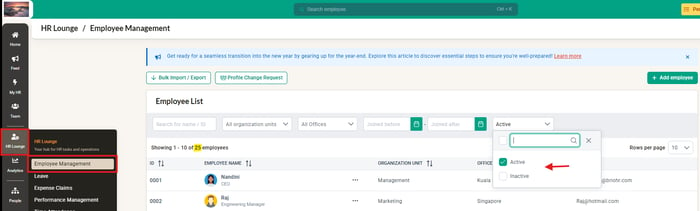
- Go to HR Lounge > Employee Management > Employee List.
- Compare the number of employees with your source headcount.
- To see leavers, use the Inactive filter. Confirm that everyone who left from the beginning of this year is there.
Click into HR Lounge > Employee Management > Employee List
Step 3: Compare your data using the Employee Information Report
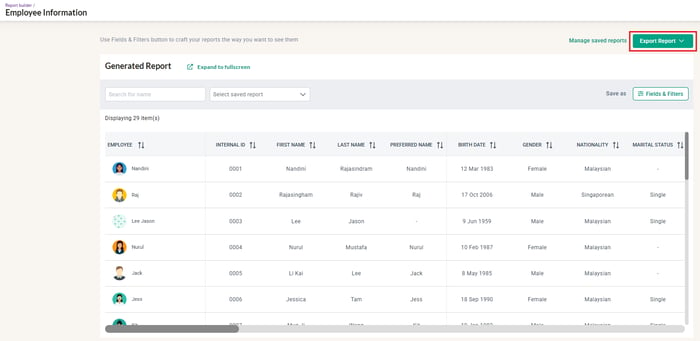
- Go to Analytics > Report Builder, find Employee Information and click Create.
- Customise the fields you want to see (see the table below), then click Export Report.
- Put the export next to the file you sent us and compare it column by column. This is the quickest way to catch mistakes across your whole headcount.
Click into Analytics > Report Builder > Employee Information > Create
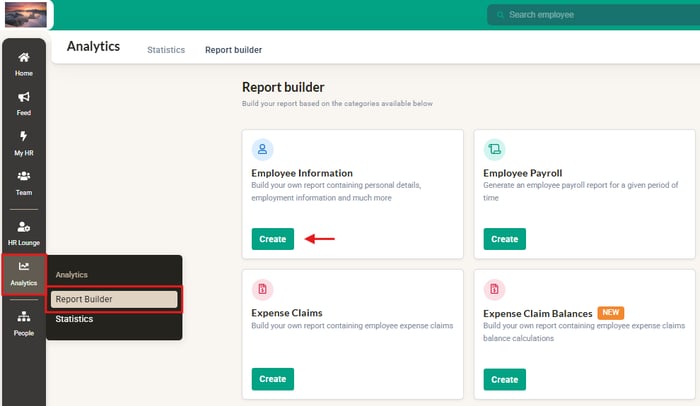
Go through the data captured, then click Export Report to generate a copy of the report
Suggested fields to compare:
| Field | What to look for |
|---|---|
| First name, Last name | Spelling matches your source. |
| Email address | Unique, and spelled correctly. No blanks. |
| Staff ID | Unique and consistent with your other files. |
| Office name | Every employee is linked to an office. |
| Department name, Job title, Job grade | Complete and consistent. |
| Employment type | Matches your records (Full time, Part time, Contractor and so on). |
| Start date, Last day of employment | Correct dates; leavers have a last day. |
| Manager | Correct manager for each person; no blanks. |
| User group | Correct group for each person. |
| Gender, Birth date, Nationality | Complete, since they can affect eligibility for some leave types. |
💡 Tip
If this report is greyed out or you can't view it, check your user group permissions to make sure access to this report is enabled.
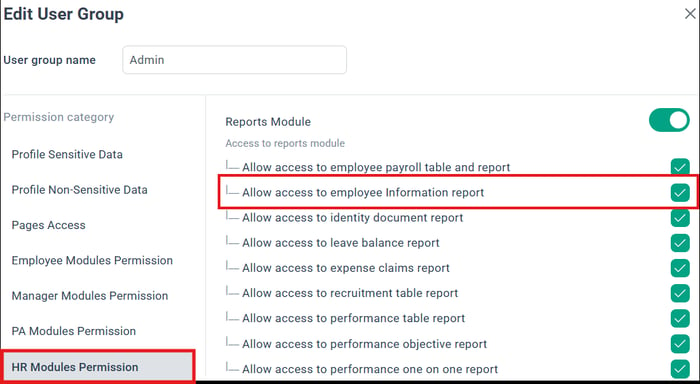
🔗 Related article
Step 4: Spot-check 5 to 10 profiles
- Open a handful of employee profiles and compare them with your source file: personal details, job details, dates and any optional tabs.
- Choose a mix: a manager, a new joiner, a leaver, someone in each office, and someone with optional details (family, emergency contact, experience).
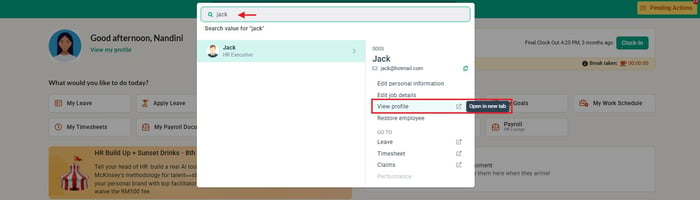
Search for the employee name, then click View profile to check the profile information
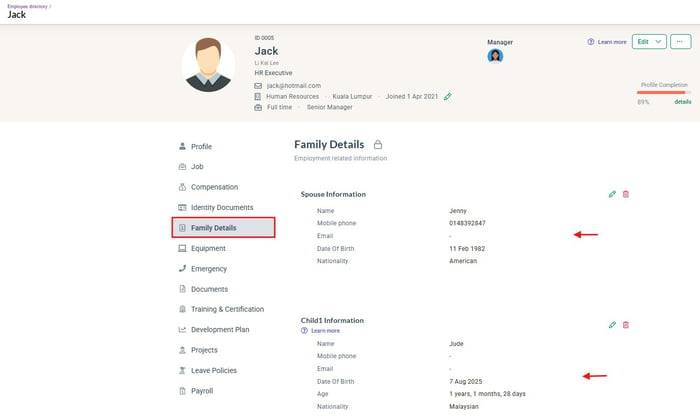
Example: check the Family Details tab to confirm the information is accurate
Step 5: Check reporting lines
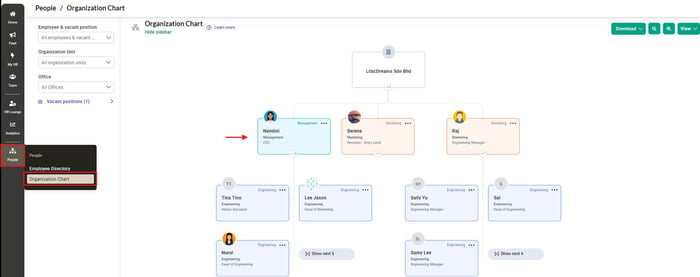
- Go to People > Organization chart and confirm each employee's manager is correct.
- Make sure every manager is also an employee in brioHR.
- Look for circular reporting (A reports to B, and B reports to A).
Click into People > Organization chart to check the reporting lines assigned
💡 Tip
Ask each manager to confirm their direct reports before go-live. It is the fastest way to catch reporting line errors.
← Previous: Common Profile & Dashboards Migration Mistakes, an Example, and Sending Your Templates
Next: How to Verify Profile & Dashboards Access and Get Ready for Go-Live →
Back to Profile & Dashboards Data Migration and Verification: Start Here
Ownership
By: Aqilah