Registering new employees in BrioHR can be done using two methods:
- Register Individually: Add new employees one by one by clicking on "Add New Employee." For more details, refer to [this article].
- Register in Bulk: Register multiple new employees at once via Bulk Download/Upload.
Using Method 2 can save time and streamline the registration process by allowing you to enter all relevant details in an Excel spreadsheet.
NOTE:
After bulk registration, the system will not automatically send login activation emails to new employees. You must manually click "Send Activation Email" from Settings > Users.
If you wish to send login activation emails to newly uploaded employees, please refer to [this guide 1] and [guide 2].
Step 1: Download the Employee Details Template (Excel Format)
Log in to your BrioHR account.
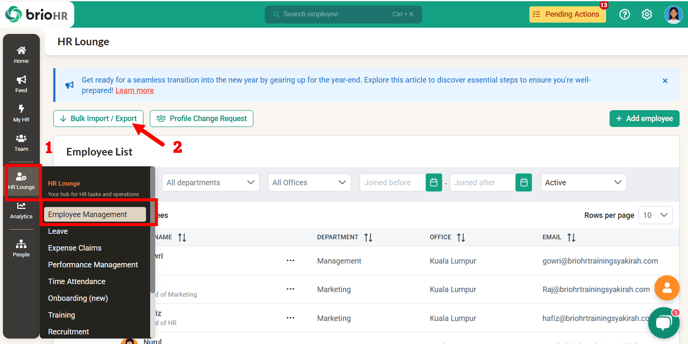
1. Go to HR Lounge on the Navigation Bar and choose Employee Management.
2. Click on the Bulk Download/Upload button.
3. Choose "Employee Details" as the import category.

4. You will be directed to the Import Employee page. Please read the notes before proceed with uploading the template:
NOTE:
- Template you download will also consist data of all existing employees, you can either remove or just added the new line.
- Deleting the existing employees from the template won't delete their profiles in the system.
WARNING:
- Please don't update/edit the employee's email address in this bulk template.
Email address is the system's unique identifier.- Updating the email address in the template will result to duplicate profile being created as the system detects the "edited email address" as a new email address.
- To update email address of employee, you need to do it from Settings. For more details, please refer to this [guide].
5. Click on the bold "Employee Details" to download the Excel template. Fill in the template with the necessary details.

IMPORTANT:
Step 2: Upload the Employee Details Template
1. Once you have completed the Excel template, click on the "+ Browse Files" button to upload the template.

After uploading the template, you will see a review of the data you're about to import. The system shows the validation page as per image below.
a. If there are any error in the file, it will be listed in the warning section with remark on which line and what column that are missing/wrong.
b. If there are new employee added in the file, system will show 'New'.

You can modify your template and reupload back by click on Reupload button.
- If no warning message appears, it means the file is good to go.
2. To continue saving and importing the data, click on the "Save Import Data" button.


NOTE:
You can repeat the same steps to do bulk import or update for other categories.
Need Assistance?
If you have any questions or require assistance, please reach out to our support team via live chat or email us at support@briohr.com.