![brioHR-logo-color.svg]](https://support.briohr.com/hubfs/brioHR-logo-color.svg)
Audience & Scope
Audience: HR and admin teams setting up brioHR for the first time
Module: Expense Claims
Country: Malaysia, Singapore
Pre-requisites: Implementation kick-off meeting with your Implementation Manager (IM) completed; the Expense Claims migration template from your IM; Employee List loaded and verified (Profile & Dashboards)
This article is part of the Expense Claims data migration series. It follows the Expense Claims Data Migration Guide (PDF).
Claim Policies tab
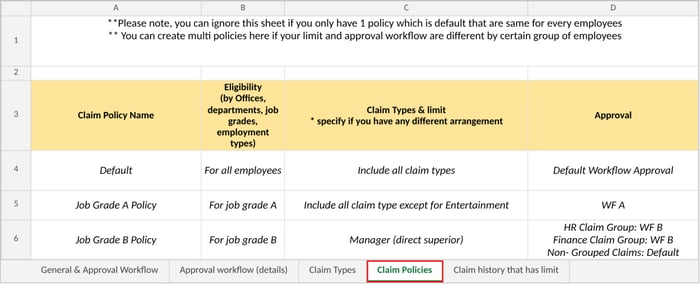
You can skip this tab if you only have one policy, the same claim types, limits and workflow for every employee. Fill it in if your limits or approval workflows are different for certain groups of employees. Add one row per policy, and start with your default policy.
| Column | Required | Notes |
|---|---|---|
| Claim Policy Name | If applicable | For example "Default" or "Job Grade A Policy". |
| Eligibility | If applicable | Who the policy is for, by office, department, job title, job grade, employment type or gender, for example "For job grade A" or "For all employees". Use names that you've listed in your Company Data & Employee List Template for Offices, Departments, Job title and Job grade. Employment type options: Full time, Part time, Freelance, Intern, Contractor, Contract. Gender options: Male, Female. Eligibility decides which policies can be chosen when an employee is assigned; it doesn't assign them. |
| Claim Types & limit | If applicable | Which claim types the policy includes, and any limits that differ from the Claim Types tab, for example "Include all claim types except Entertainment". |
| Approval | If applicable | Which workflow this policy uses. Use the workflow names from the Approval workflow (details) tab. If different claim groups use different workflows, list each one, for example "HR Claim Group: WF B; Finance Claim Group: WF B; Non-grouped claims: Default". |
💡 Good to know
If a few employees have their own limit for a claim type (for example a phone allowance limit for one person), describe it in the Notes to BrioHR column of the Claim Types tab, or tell your IM. These can be set as custom limits for individual employees inside the policy.
Sample of the Claim Policies tab:
🔗 Related article
Claim history that has limit tab
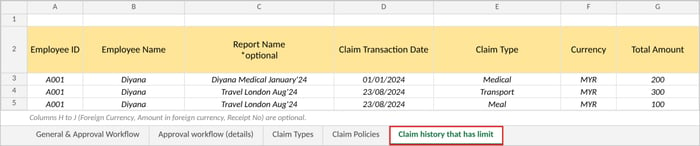
Add one row per claim item made this year (from 1 January up to go-live) for every claim type that has a monthly or yearly limit. You don't need history for claim types with no limit, or with only a per transaction limit. "Claim history and your starting balances" below explains why this tab matters.
| Column | Required | Notes |
|---|---|---|
| Employee ID | Fill in | The same ID as on your Employee List (Staff ID). If your company doesn't use employee IDs, leave it blank and make sure the Employee Name matches the Employee List exactly. |
| Employee Name | Fill in | Full name exactly as on the Employee List. |
| Report Name | If applicable | The name of the claim report the item belonged to, for example "Travel London Aug'24". Items with the same report name are grouped together. |
| Claim Transaction Date | Fill in | The date of the expense (not the date it was submitted or approved). Use YYYY-MM-DD, for example 2026-03-14. |
| Claim Type | Fill in | Exactly as the Claim Item Name on the Claim Types tab. |
| Currency | Fill in | Your company currency code, for example the 3-letter code your payroll uses. |
| Total Amount | Fill in | The amount approved in your company currency, as a number. |
| Foreign Currency | If applicable | The currency of the receipt, if it was not your company currency, for example USD. |
| Amount in foreign currency | If applicable | The receipt amount in that foreign currency. |
| Receipt No | If applicable | The receipt or reference number. |
⚠ Important
Cash Advance claim types can't be brought in through the claim history. If employees have cash advances that are still open at go-live, tell your IM so you can agree how to settle them.
Sample of the Claim history that has limit tab:
🔗 Related article
Claim history and your starting balances
brioHR works out each employee's remaining balance for a claim type as their limit minus everything they have claimed so far. Claims count towards the limit from the moment they are submitted (and even while they are still open), not only once they are paid.
- Monthly limits are counted by the transaction date of each claim item. A taxi ride on 16 February that is submitted on 6 March counts against February.
- Yearly limits follow the calendar year and cannot be reset by hand during the year.
- Items in the same claim report are each counted in their own month, based on their own transaction dates.
An example
An employee has a yearly Medical limit of 1,000. Before go-live, they had already claimed 650 for Medical in your old system this year.
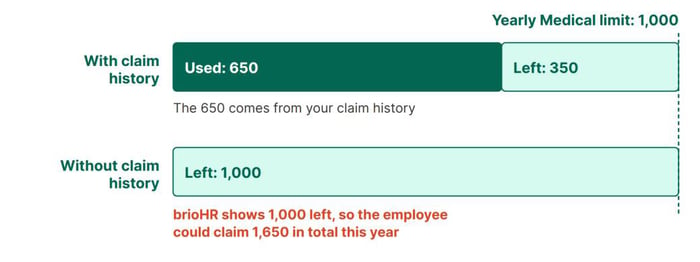
The same yearly limit, with and without claim history.
⚠ Important: don't pay history claims twice
Claims brought in from your claim history are added as approved claims, so they count towards each employee's limits. These claims were already paid in your old system. Never select them when you use Send to Payroll, or employees will be reimbursed a second time. Agree with your IM how the history claims will be marked so they are kept out of your first payroll.
Send your template to your IM
- Make sure your Employee List is final (offices, departments, job grades, employment types and manager emails), then submit your Expense Claims Migration Template to your IM.
- Once your IM has migrated your data, check it with the data verification articles
- To learn how HR, managers and employees use Expense Claims day to day, see the Expense Claims Starter Guide.
- If you're unsure how to fill in any field, your Implementation Manager is happy to help.
🔗 Well done!
Getting your claim setup right the first time means employees see the right claim types, claims reach the right approvers, and balances are correct from day one. Take your time, and ask us anything along the way.
← Previous: How to Fill In the Claim Types Tab
Next: How to Verify Your Claim Settings, Claim Types and Claim Policies →
Back to Expense Claims Data Migration and Verification: Start Here
Ownership
By: Aqilah