![brioHR-logo-color.svg]](https://support.briohr.com/hubfs/brioHR-logo-color.svg)
Audience & Scope
Audience: HR and admin teams setting up brioHR for the first time
Module: Expense Claims
Country: Malaysia, Singapore
Pre-requisites: Implementation kick-off meeting with your Implementation Manager (IM) completed; Expense Claims data migrated by your IM
This article is part of the Expense Claims data verification series. It follows the Expense Claims Data Verification Guide (PDF).
Step 4: Check your approval workflows
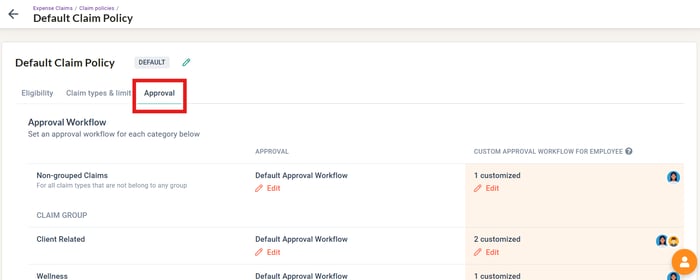
- In each policy, open Approval. Check the workflow for Non-grouped Claims and for each claim group matches the Approval column of your Claim Policies tab (or your default workflow, if you only have one).
- Open each workflow and compare it with your Approval workflow (details) tab: the approvers in order, and for each approval threshold, the threshold type (Transaction Level or Report Level), the amount and the offices.
- Check any custom approval workflows for individual employees.
- If a workflow uses the head of an org unit (for example Head of Department, Head of Division or Head of Direct Unit), check that every org unit at that level has the right head.
- If a workflow uses Manager, spot-check that employees from different departments have the right manager on their profile.
- If a workflow uses a specific employee, check it is the right person and that they are still with the company.
Click into HR Lounge > Expense Claims > Claim Policies > choose a policy > Approval
💡 Good to know
Changes to a workflow only apply to claim reports submitted after the change. Reports that were already submitted keep the workflow they had, so they need to be reopened and resubmitted to pick up the change.
🔗 Related articles
Step 5: Check who can access and act on claims
- In Admin Settings > User Groups, check each group's access to the Expense Claims module matches your User Group Access tab, and that HR and Finance users who need reports have Allow access to Expense Claims Balance Report under the Reports module permissions.
- If assistants submit claims for others, check your Personal Assistants in Admin Settings > Personal Assistant, and that their user group has the PA module permissions.
- If managers or HR approve or act on behalf of others, check those permissions are switched on for their user group.
🔗 Related articles
Step 6: Check your claim history and balances
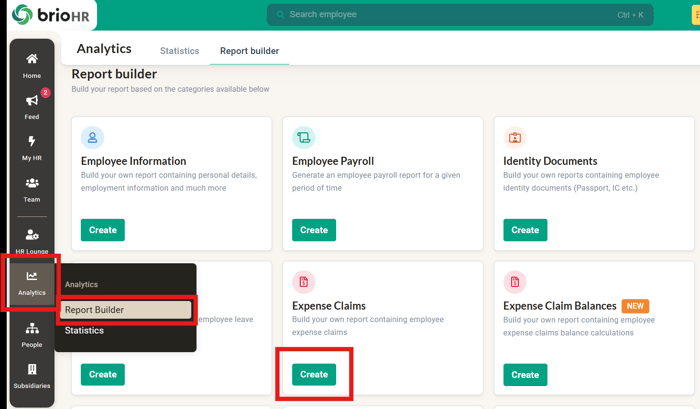
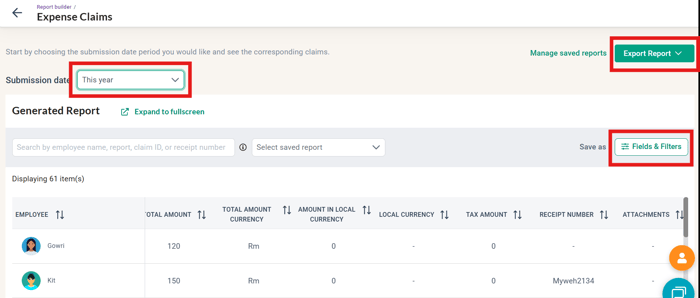
- Check the big numbers first. Go to Analytics > Report Builder, find the Expense Claims report, and click Create. Choose ‘This year’ for the Submission date and clear all irrelevant fields (under Fields & Filters). Export the report to check that the total claims for each employee tallies what you provided for data migration.
- Compare the number of claim items as well, so a missing row and an extra row don't cancel each other out.
- If every total tallies, your history has been migrated completely and you can move on to the balance spot-check below.
- If a total does not tally, filter the report to that claim type and compare it with your template, employee by employee, to find the missing or extra rows. If you have many employees, see "Checking a large headcount" below.
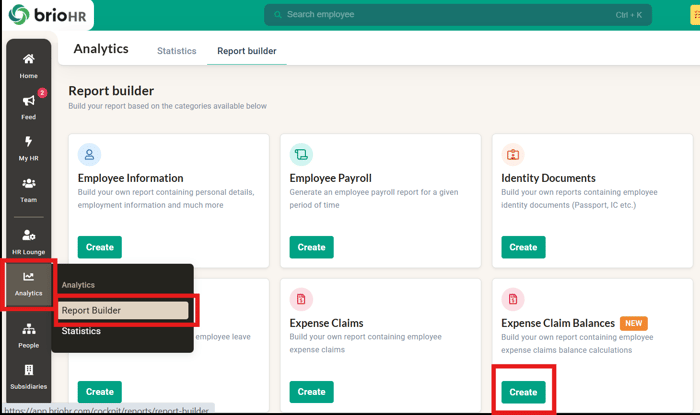
- Spot-check balances. Run the Expense Claim Balances report with today's date as the effective date. Choose employees with different claim setups, for example someone in each policy, someone with a monthly limit claim this month, someone with an individual custom limit and someone in each office, and compare their limit, amount used and remaining balance with your old system or records.
Click into Analytics > Report Builder > Expense Claims
Click into Analytics > Report Builder > Expense Claim Balances
⚠ Important: don't send history claims to payroll
Your migrated history claims show as Approved on the Claim Request page. They were already paid in your old system. When you send claims to payroll for the first time, make sure only new claims are selected, using the period filter, and agree with your IM how the history claims are kept out.
🔗 Related articles
Checking a large headcount
If you have many employees, checking one balance at a time is slow and easy to get wrong. Instead, export the Expense Claim Balances report, compare it with your submitted template in a spreadsheet, and only look closely at the rows that don't match. The article below walks you through it step by step, with practice files.
🔗 Related article
⚠ Note every difference
Check whether there are any discrepancies. Note down every difference you find, however small, and raise it with your IM so the cause can be found and explained before go-live.
← Previous: How to Verify Your Claim Settings, Claim Types and Claim Policies
Next: How to Check Expense Claims Data for a Large Headcount →
Back to Expense Claims Data Migration and Verification: Start Here
Ownership
By: Aqilah