![brioHR-logo-color.svg]](https://support.briohr.com/hubfs/brioHR-logo-color.svg)
Audience & Scope
Audience: HR and admin teams setting up brioHR for the first time
Module: Leave
Country: Malaysia, Singapore
Pre-requisites: Implementation kick-off meeting with your Implementation Manager (IM) completed; Leave data migrated by your IM; HR/Admin access to the Leave module
This article is part of the Leave data verification series. It follows the Leave Data Verification Guide (PDF).
Your leave policies, approvers and opening balances are now in brioHR. Before employees start applying for leave, check that everything landed the way you intended. Wrong setup is difficult to fix later, and wrong opening balances are the most common cause of questions on day one. Remember, your Implementation Manager (IM) is there to help!
Key terms
| Term | Meaning |
|---|---|
| Leave type and policy | A leave type (for example Annual Leave) can hold several policies, each with its own rules. |
| General Configuration | The settings of a policy that apply to every employee assigned to it. |
| Custom Configuration | An exception for a specific employee on a policy. It overrides the General Configuration for that person. |
| Credit-based leave | Leave earned as a credit, such as Replacement Leave, Off in Lieu or Birthday Leave. It cannot be converted to a fixed entitlement after creation. |
Verify your data, step by step
Keep your Leave template open next to brioHR so you can compare as you go. Steps 1 to 5 are in this article; Steps 6 to 10 are in How to Verify Leave Approvers, Entitlements and Balances. Allow a little more time for Step 8, because it is the most important one.
Step 1: Check your leave types and policies
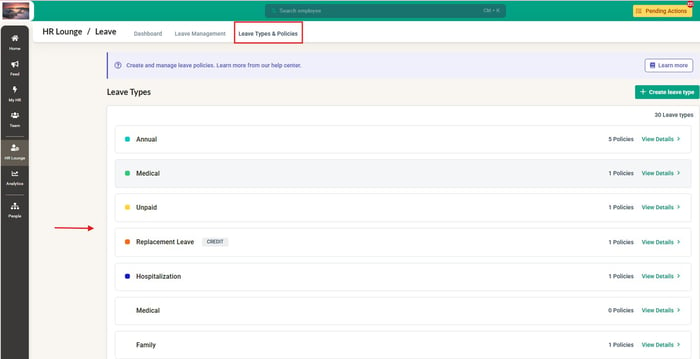
- Go to HR Lounge > Leave > Leave Types & Policies.
- Confirm every leave type you listed exists, with the right name.
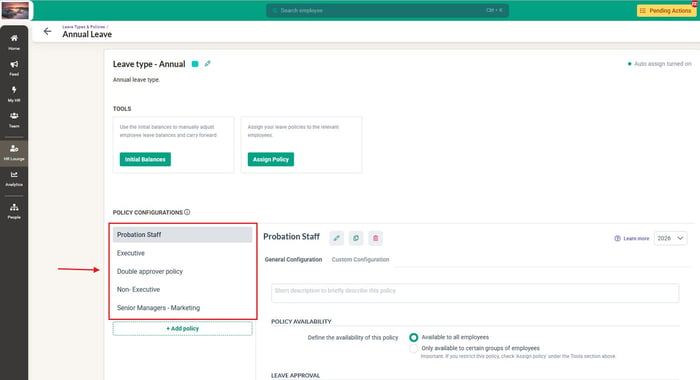
- Open every policy under each leave type (click View leave details, then select each policy). A leave type can hold several policies, each with its own rules, so check them all.
Click into HR Lounge > Leave > Leave Types & Policies
Click View leave details, then select each policy under the leave type
Step 2: Check the General Configuration
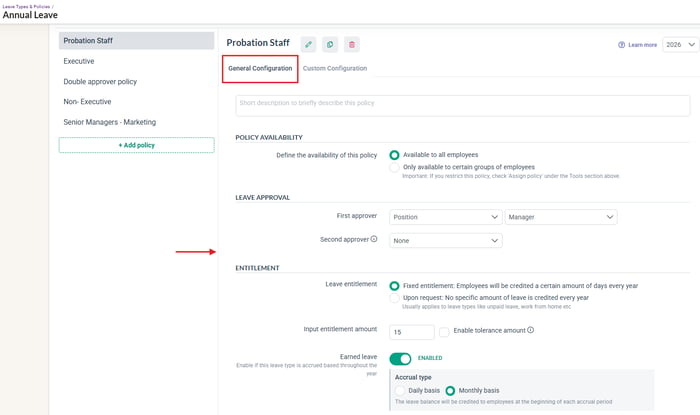
General Configuration applies to every employee assigned to the policy, so one error affects everyone on it. For each policy, open General Configuration and compare it with your template:
- Entitlement: fixed or earned entitlement, the number of days, seniority scale, and proration and rounding.
- Availability: who the policy is available to.
- Approval flow: the first (and second, if any) approver. You will check these again in Step 6.
- Carry forward: whether it is enabled, the maximum, and the expiry.
- Booking rules and advanced settings: half-day, backdating, advance applications, attachments, and the tolerance amount if you use it.
Open the policy > General Configuration
Step 3: Check the Custom Configuration (if you have any)
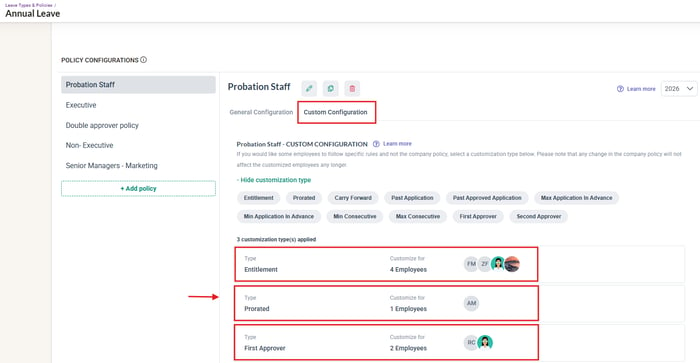
Custom Configuration is for exceptions, such as a different entitlement, carry forward setting or approver for a specific employee. If you have no exceptions, skip this step.
- Open the policy, select Custom Configuration, and review each exception.
- Confirm each exception is for the right employee and matches the list of exceptions you provided.
- Custom Configuration is set policy by policy. It does not carry across to other policies under the same leave type, so check every policy that needs it.
- If you cannot see Custom Configuration, check that your user group has HR/Admin access to the Leave module (Settings > User Groups > HR Modules Permission).
Open the policy > Custom Configuration
Step 4: Check credit-basis against fixed entitlement
- For each leave type, confirm whether it is credit-based (such as Replacement Leave, Off in Lieu or Birthday Leave) or a fixed yearly entitlement.
Look out for the credit-based indicator on the leave type
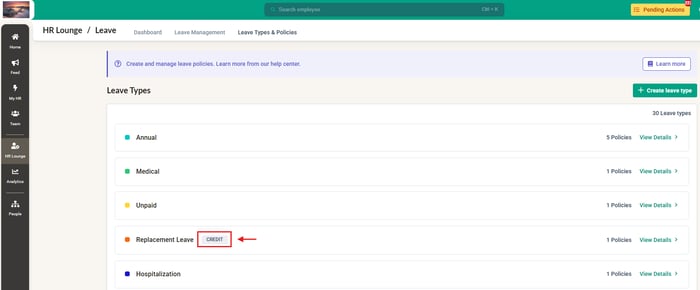
⚠ Important
A credit-based leave type cannot be changed to fixed entitlement, or the other way round, after it is created. If it is wrong, contact your IM before creating anything new, because the leave type needs to be recreated and its history re-migrated.
Step 5: Check eligibility and policy assignment
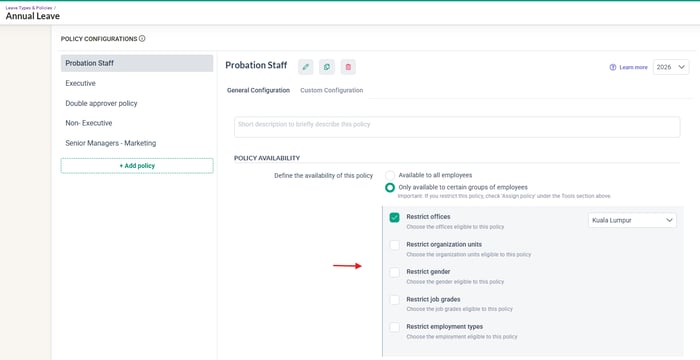
- For every leave type that is not available to all employees, confirm the restriction (office, department, gender, job grade or employment type) matches your policy.
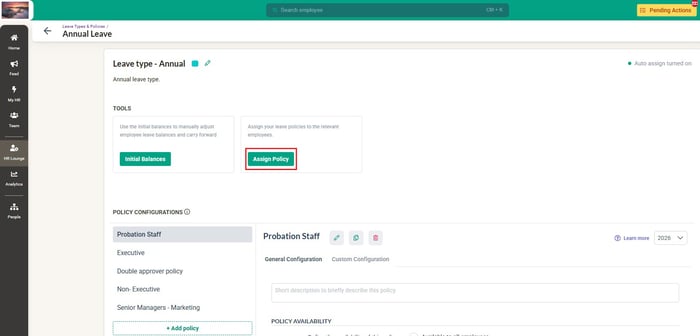
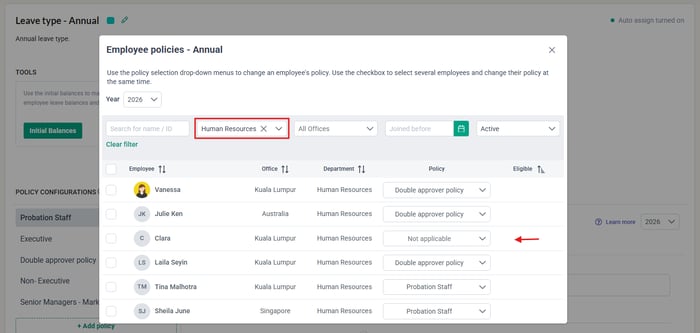
- Confirm every employee is assigned to the correct leave policy. The policy decides their entitlement, approver and booking rules. Spot-check people in different offices, departments, job grades and employment types.
- Ask a pilot user from each affected group to confirm they can see the leave type, and one from outside the group to confirm they cannot.
Check the policy availability and restrictions
Click Assign Policy on the leave type
Check each employee's policy in the Employee policies list
← Previous: Leave Template: Malaysia vs Singapore, Common Mistakes and an Example
Next: How to Verify Leave Approvers, Entitlements and Balances →
Back to Leave Data Migration and Verification: Start Here
Ownership
By: Aqilah