![brioHR-logo-color.svg]](https://support.briohr.com/hubfs/brioHR-logo-color.svg)
Audience & Scope
Audience: HR and admin teams setting up brioHR for the first time
Module: Payroll Singapore
Country: Singapore
Pre-requisites: Implementation kick-off meeting with your Implementation Manager (IM) completed; Payroll Singapore data migrated by your IM
This article is part of the Payroll Singapore data verification series. It follows the Payroll Singapore Data Verification Guide (PDF).
Your payroll data is now in brioHR. Before you run payroll live, this guide helps you confirm everything landed the way you intended, then run a parallel run: a full payroll cycle in brioHR alongside your old system. If a check doesn't pass the first time, that's completely normal. Your Implementation Manager (IM) is there to help.
Key terms
Payroll center: A group of employees processed together in one payroll run — e.g. one per legal entity or branch.
Parallel run: One full payroll cycle run in brioHR alongside your old system, to confirm the numbers match before you go live (see How to Process a Payroll Parallel Run in brioHR (Singapore Payroll Guide)).
Verify your data, step by step
Keep your source files open next to brioHR so you can compare as you go: the Company Payroll Info and Employee Payroll Data templates you submitted, and your payroll history reports.
Step 1: Check your payroll centers and company details
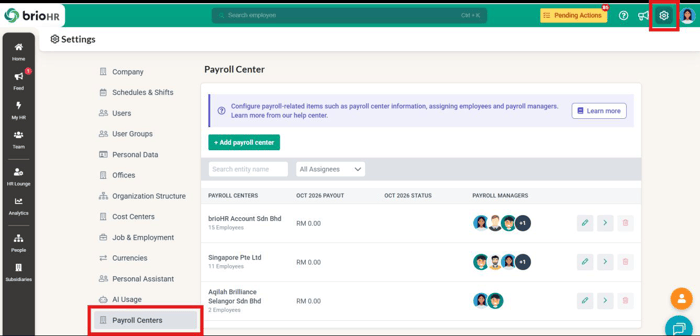
- Go to Settings > Payroll Centers in brioHR.
- Confirm every payroll center in your Company Payroll Info template exists, with the correct Payroll Managers and the right number of employees.
- Payroll Managers are the employees who can access this center's payroll data, including its reports.
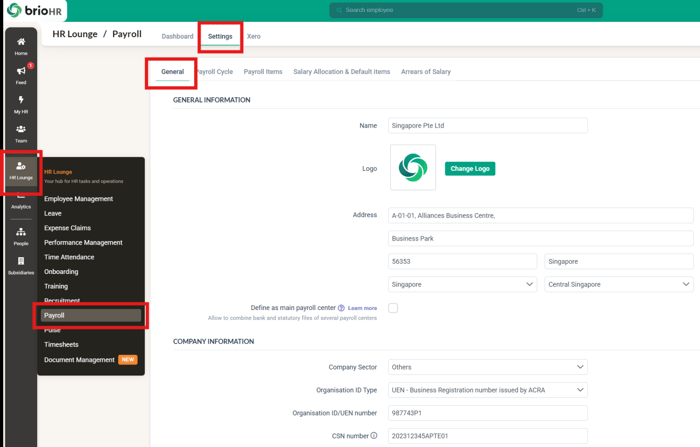
- To check each payroll center's settings, go to HR Lounge > Payroll > Settings > General, and compare them with your Company Payroll Info tab.
- Confirm the company registration, ACRA, IRAS and CPF Submission Number (CSN), the authorised person, and the bank details, bank file format and DBS organisation ID (if applicable).
- On the same General page, confirm the pay day, working days, hours per day, and the proration, unpaid leave and overtime calculation settings, including Income Basis for Unpaid Leave Calculation and Normal overtime hourly rate multiplier.
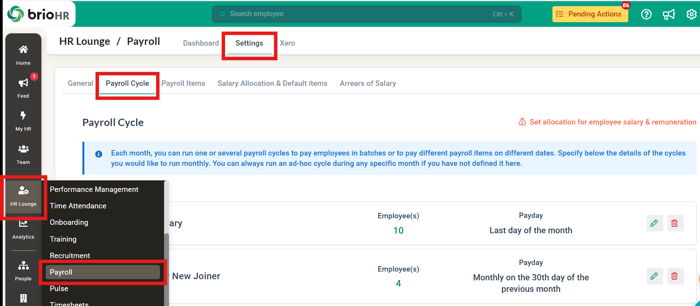
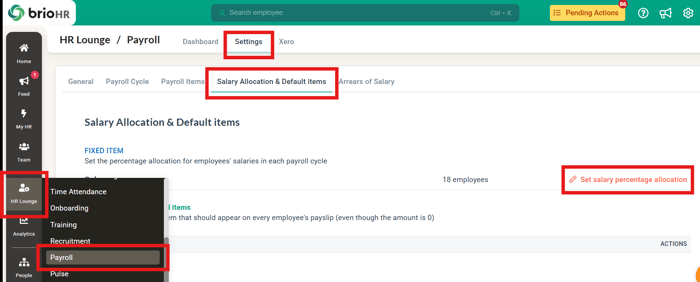
- If you run more than one payment cycle, go to HR Lounge > Payroll > Settings and open the Payroll Cycle tab (cycle names) and the Salary Allocation & Default Items tab (salary split), and compare them with your template. Confirm the default pay day for each default cycle.
Click into Settings > Payroll Centers
Click into HR Lounge > Payroll > Settings > General to see each payroll center's settings
Click into HR Lounge > Payroll > Settings > Payroll Cycle to see each payroll cycle’s settings
Click into HR Lounge > Payroll > Settings > Salary Allocation & Default Items to see salary allocation settings
🔗 Related articles
Step 2: Check your pay items
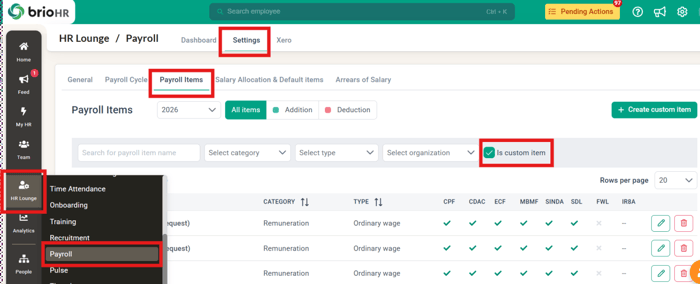
- Go to HR Lounge > Payroll > Settings > Payroll Items, and tick 'Is custom item' to filter.
- For each custom allowance and deduction, confirm the wage type (Ordinary wage, Additional wage or Not part of wage), the statutory bodies it counts towards (CPF, SDL, CDAC, ECF, MBMF, SINDA, FWL) and its EA/IR8A field.
- Confirm the category of each custom pay item (for example Allowance, Remuneration, Benefit-in-Kind, Reimbursement or Deduction) against the pay items you agreed with your IM.
- Confirm benefit-in-kind and overtime items where they apply.
- Discuss with your IM any pay item that may not be taxable or may not count for CPF.
Click into HR Lounge > Payroll > Settings > Payroll Items (select 'is custom item' to filter)
🔗 Related article
Step 3: Spot-check employee payroll data
Click into HR Lounge > Employee Management (tick active and inactive employees)
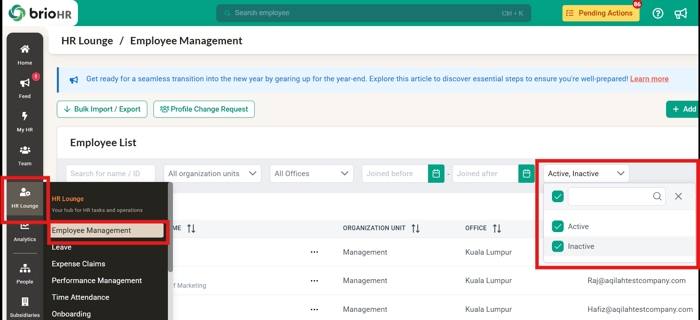
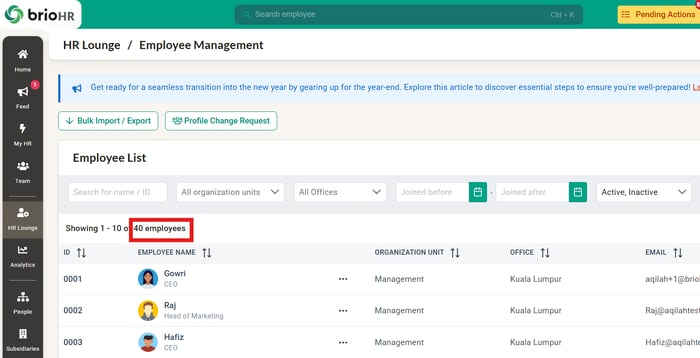
- Compare the employee count in brioHR with your source file, including employees who resigned earlier this year. Go to HR Lounge > Employee Management, tick both active and inactive employees in the filter, and read the total count.
Click into HR Lounge > Employee Management > Choose employee > Payroll
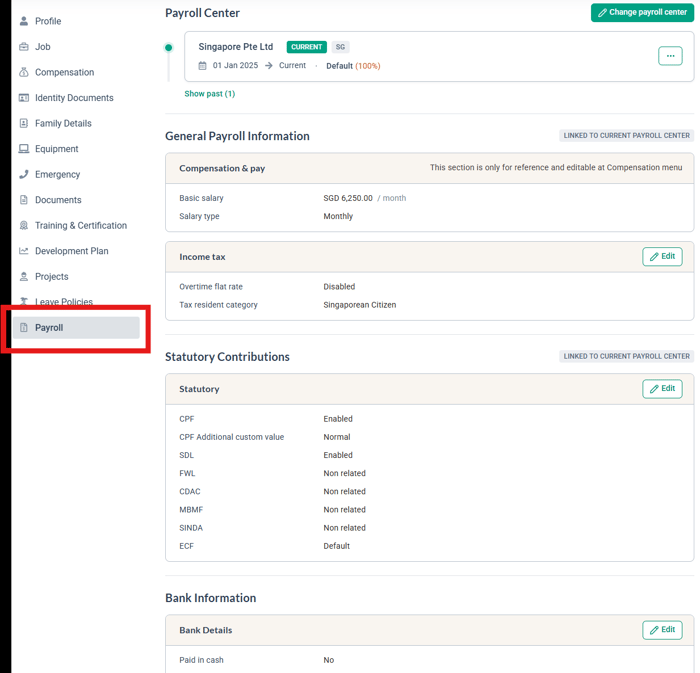
- Select employees with different payroll setups, open their payroll profiles and compare them with your source file: wage type, basic salary, ID type and number, resident category, work permit category, PR effective date and bank details.
- Choose employees with different setups: paid hourly, a Permanent Resident (check the PR effective date), a work pass holder, an employee aged above 55, someone in each community fund, and someone whose salary is prorated. CPF, community fund, SDL and FWL settings are all on the employee's Payroll tab.
🔗 Related article
Step 4: Check statutory settings
- Confirm CPF is Enabled or Non related as intended for each employee, based on their resident category, and check their date of birth: CPF rates depend on age.
- Confirm the PR effective date for every Permanent Resident, and that the PR category (Permanent Resident, Graduated or Full Graduated) is right.
- Confirm the CDAC, ECF, MBMF and SINDA settings match each employee (only that employee's fund should be Enabled), and SDL for each employee and FWL for work permit holders.
🔗 Related articles
← Previous: Common Payroll Migration Mistakes, an Example, and Sending Your Templates (Singapore Payroll Guide)
Next: How to Verify Employee Pay Items and Payroll History (Singapore Payroll Guide) →
Back to Payroll Data Migration and Verification: Start Here (Singapore Payroll Guide)
Ownership
By: Aqilah