![brioHR-logo-color.svg]](https://support.briohr.com/hubfs/brioHR-logo-color.svg)
Audience & Scope
Audience: HR and admin teams setting up brioHR for the first time
Module: Time Attendance
Country: Malaysia, Singapore
Pre-requisites: Implementation kick-off meeting with your Implementation Manager (IM) completed; Time Attendance data migrated by your IM
This article is part of the Time Attendance data verification series. It follows the Time Attendance Data Verification Guide (PDF).
Your work shifts, work schedules and Time Attendance policies are now set up in brioHR, along with the settings you agreed with your IM. Before employees start clocking in for real, this guide helps you confirm everything landed the way you intended, then run a trial: a short period when a group of employees clock in on brioHR alongside your current system. If a check doesn't pass the first time, that's completely normal. Your Implementation Manager (IM) is there to help.
Key terms
Rostering: The page where HR and supervisors see each employee's shift for each day, change it, and publish it (HR Lounge > Time Attendance > Rostering). A green tick next to an employee's name means their roster is published.
Daily Attendance: The page showing every employee's clock-ins and clock-outs for one day, where HR and supervisors can add a missing entry or mark someone absent.
Timesheet status: Open (not yet approved), Incomplete (a clock-out is missing), Approved (locked), Sent to Payroll, then Paid once the payroll cycle is completed.
Time Attendance reports: Three reports in Report Builder. Time Log: clock-ins, clock-outs and breaks. Timesheet: daily hours, lateness, early outs and overtime. Roster: scheduled shifts and roster status. Each report can only pull a maximum of 1 month of data at a time.
Trial run: A short period before go-live when a group of employees clock in on brioHR as well as your current system, so you can compare the results.
Verify your data, step by step
Keep your source files open next to brioHR so you can compare as you go: the Time Attendance Migration Template you submitted, and the settings you agreed with your IM.
Step 1: Check your work shifts
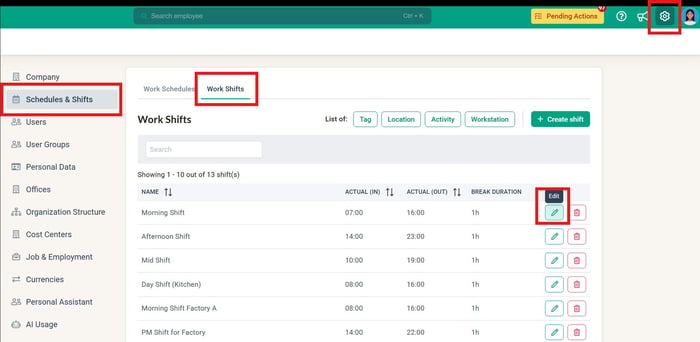
- Go to Admin Settings > Schedules & Shifts > Work Shifts. Check that every shift on your Work Shifts tab is listed, with nothing extra (such as the template's "Mon to Fri" example).
- Open each shift and compare it with your template: Actual (In) and Actual (Out), Earliest (In), Late (In), Earliest (Out), Late (Out) and break duration.
- Check the break settings you agreed: Track break lateness, Exclude unused break from worked hours and any break period.
- On the Shift Assignments tab, check each shift's tags and locations. On the Shift Settings tab, check how half-day leave splits the shift.
Click into Admin Settings > Schedules & Shifts > Work Shifts
🔗 Related article
Step 2: Check your work schedules
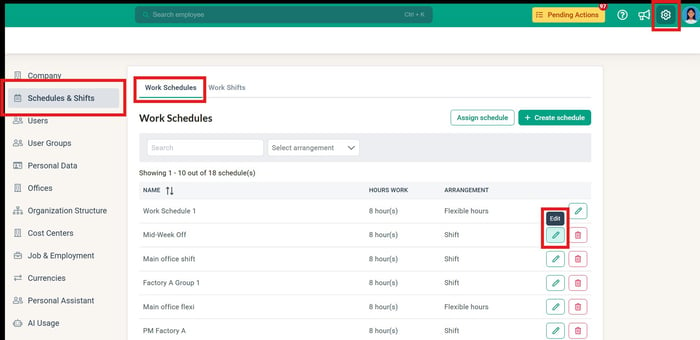
- Go to Admin Settings > Schedules & Shifts > Work Schedules. Check that every schedule on your Work Schedules tab is listed.
- Open each schedule and check: Work Hours per Day, Work on Public Holiday, Work Arrangement (flexible hours or shift) and the Default Pattern.
- For a Full Week pattern, check each day is the right Full day, Half day or Rest day, and has the right shift. For a Custom pattern, check the work days, rest days and the Reference Date.
- For shift schedules, check the Split Shift Time (12:00 AM unless shifts run past midnight).
- If you asked for any work pattern variations, check each one's dates and pattern under Work Pattern Variation.
Click into Admin Settings > Schedules & Shifts > Work Schedules
🔗 Related articles
Step 3: Check who follows which schedule
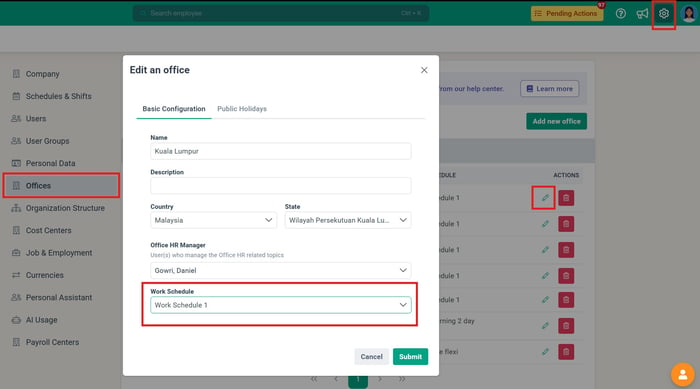
- Go to Admin Settings > Offices. Open each office and check its Work Schedule is the one you agreed with your IM.
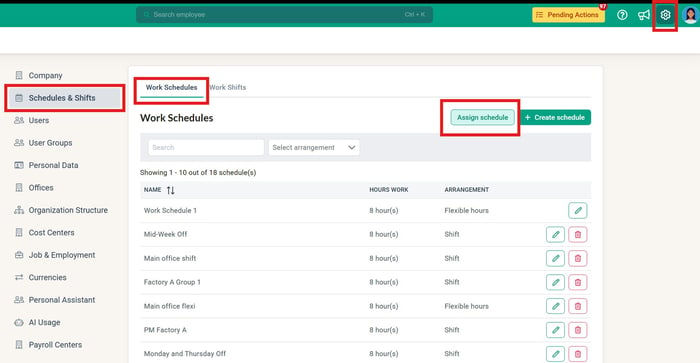
- Go to Admin Settings > Schedules & Shifts > Assign Schedule. Employees who follow their office show Follow office schedule. Check that every employee who works differently has their own schedule, and that no one else does. Include recent new joiners.
Click into Admin Settings > Offices > Edit > Work Schedule
Click into Admin Settings > Schedules & Shifts > Assign Schedule
🔗 Related articles
Step 4: Check your Time Attendance policies and who is in them
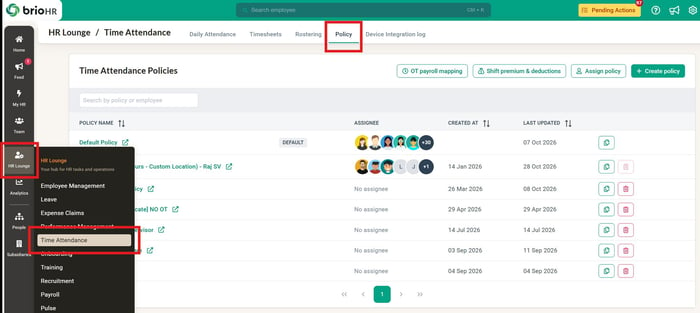
- Go to HR Lounge > Time Attendance > Policy. Check every policy from your TA Policies tab is there.
- Open each policy and compare it with your template: Eligibility, Supervisor & Approval (Manager or a specific employee), and Rounding for overtime, lateness and early outs (round or not, up or down, and the interval).
- Under Other Configuration, check the clock-in settings (Step 6) and the overtime settings (Step 5).
- Check the right policy is marked Default. Every employee, including new joiners, starts in it.
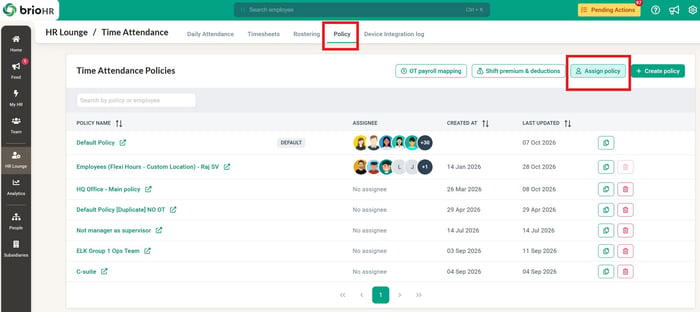
- Click Assign Policy and check every employee is in the right policy. Employees aren't moved out of the Default policy automatically, so check that employees who need a different policy have been assigned to it. Use the filters (for example by office or department) to check a whole group at once, and include recent new joiners.
- If supervisors are the employees' managers, spot-check that employees from different departments have the right manager on their profile.
Click into HR Lounge > Time Attendance > Policy > choose a policy
Click into HR Lounge > Time Attendance > Policy > Assign Policy
🔗 Related articles
← Previous: Common Time Attendance Migration Mistakes, and Sending Your Template
Next: How to Verify Overtime, Clocking In, Access and Your First Rosters →
Back to Time Attendance Data Migration and Verification: Start Here
Ownership
By: Aqilah